Integration Settings
Navigating to Integration Settings
You can navigate to the integration settings by:
- Log in using an Admin account.
- Select the company settings in the bottom left of the page as indicated in the image below
Note: If you are not on an Admin account you will not see this. You will only see the bubble below which is personal settings, not company settings.
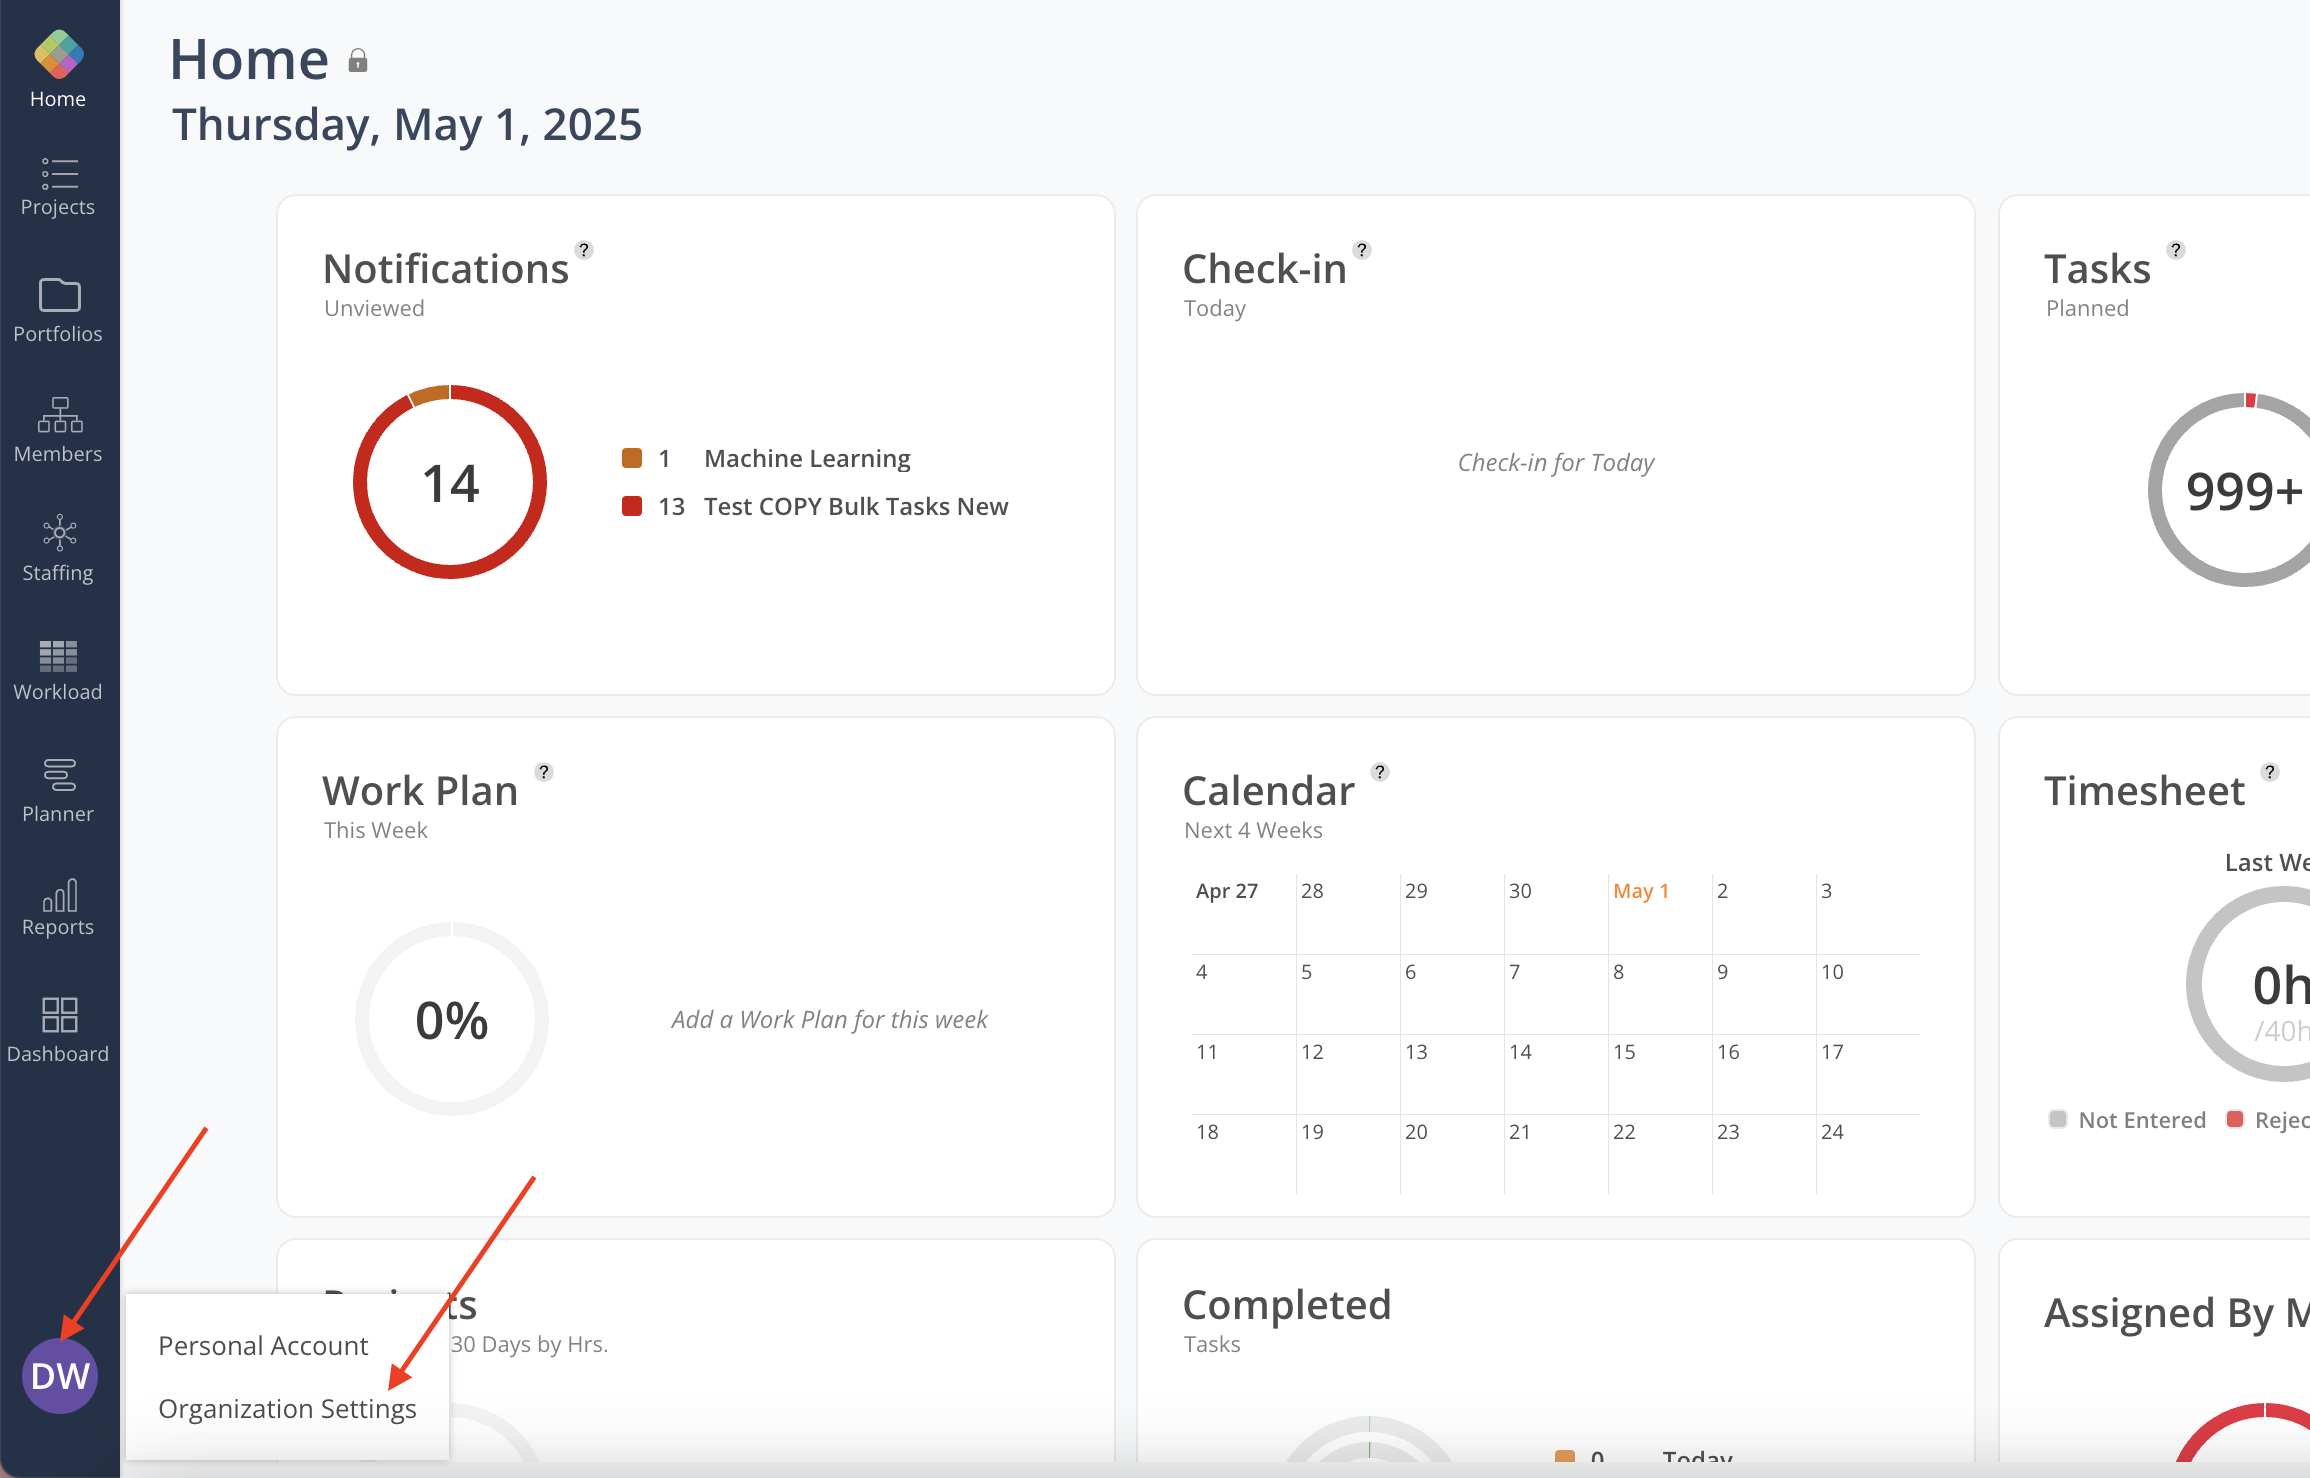
- From there navigate to integrations on the side menu as shown here:
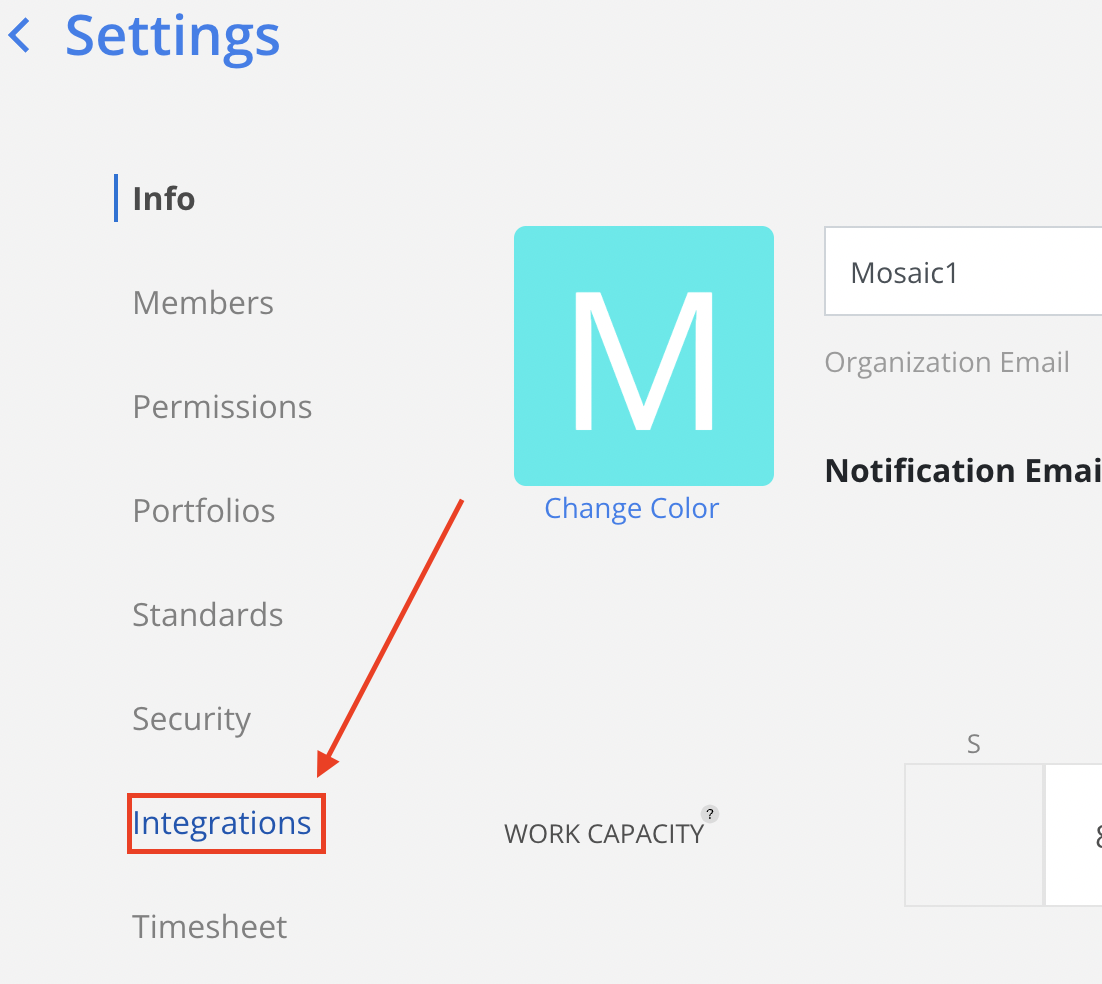
The Integration page variesDepending on the integration you have set up, the details of the next page will vary slightly.
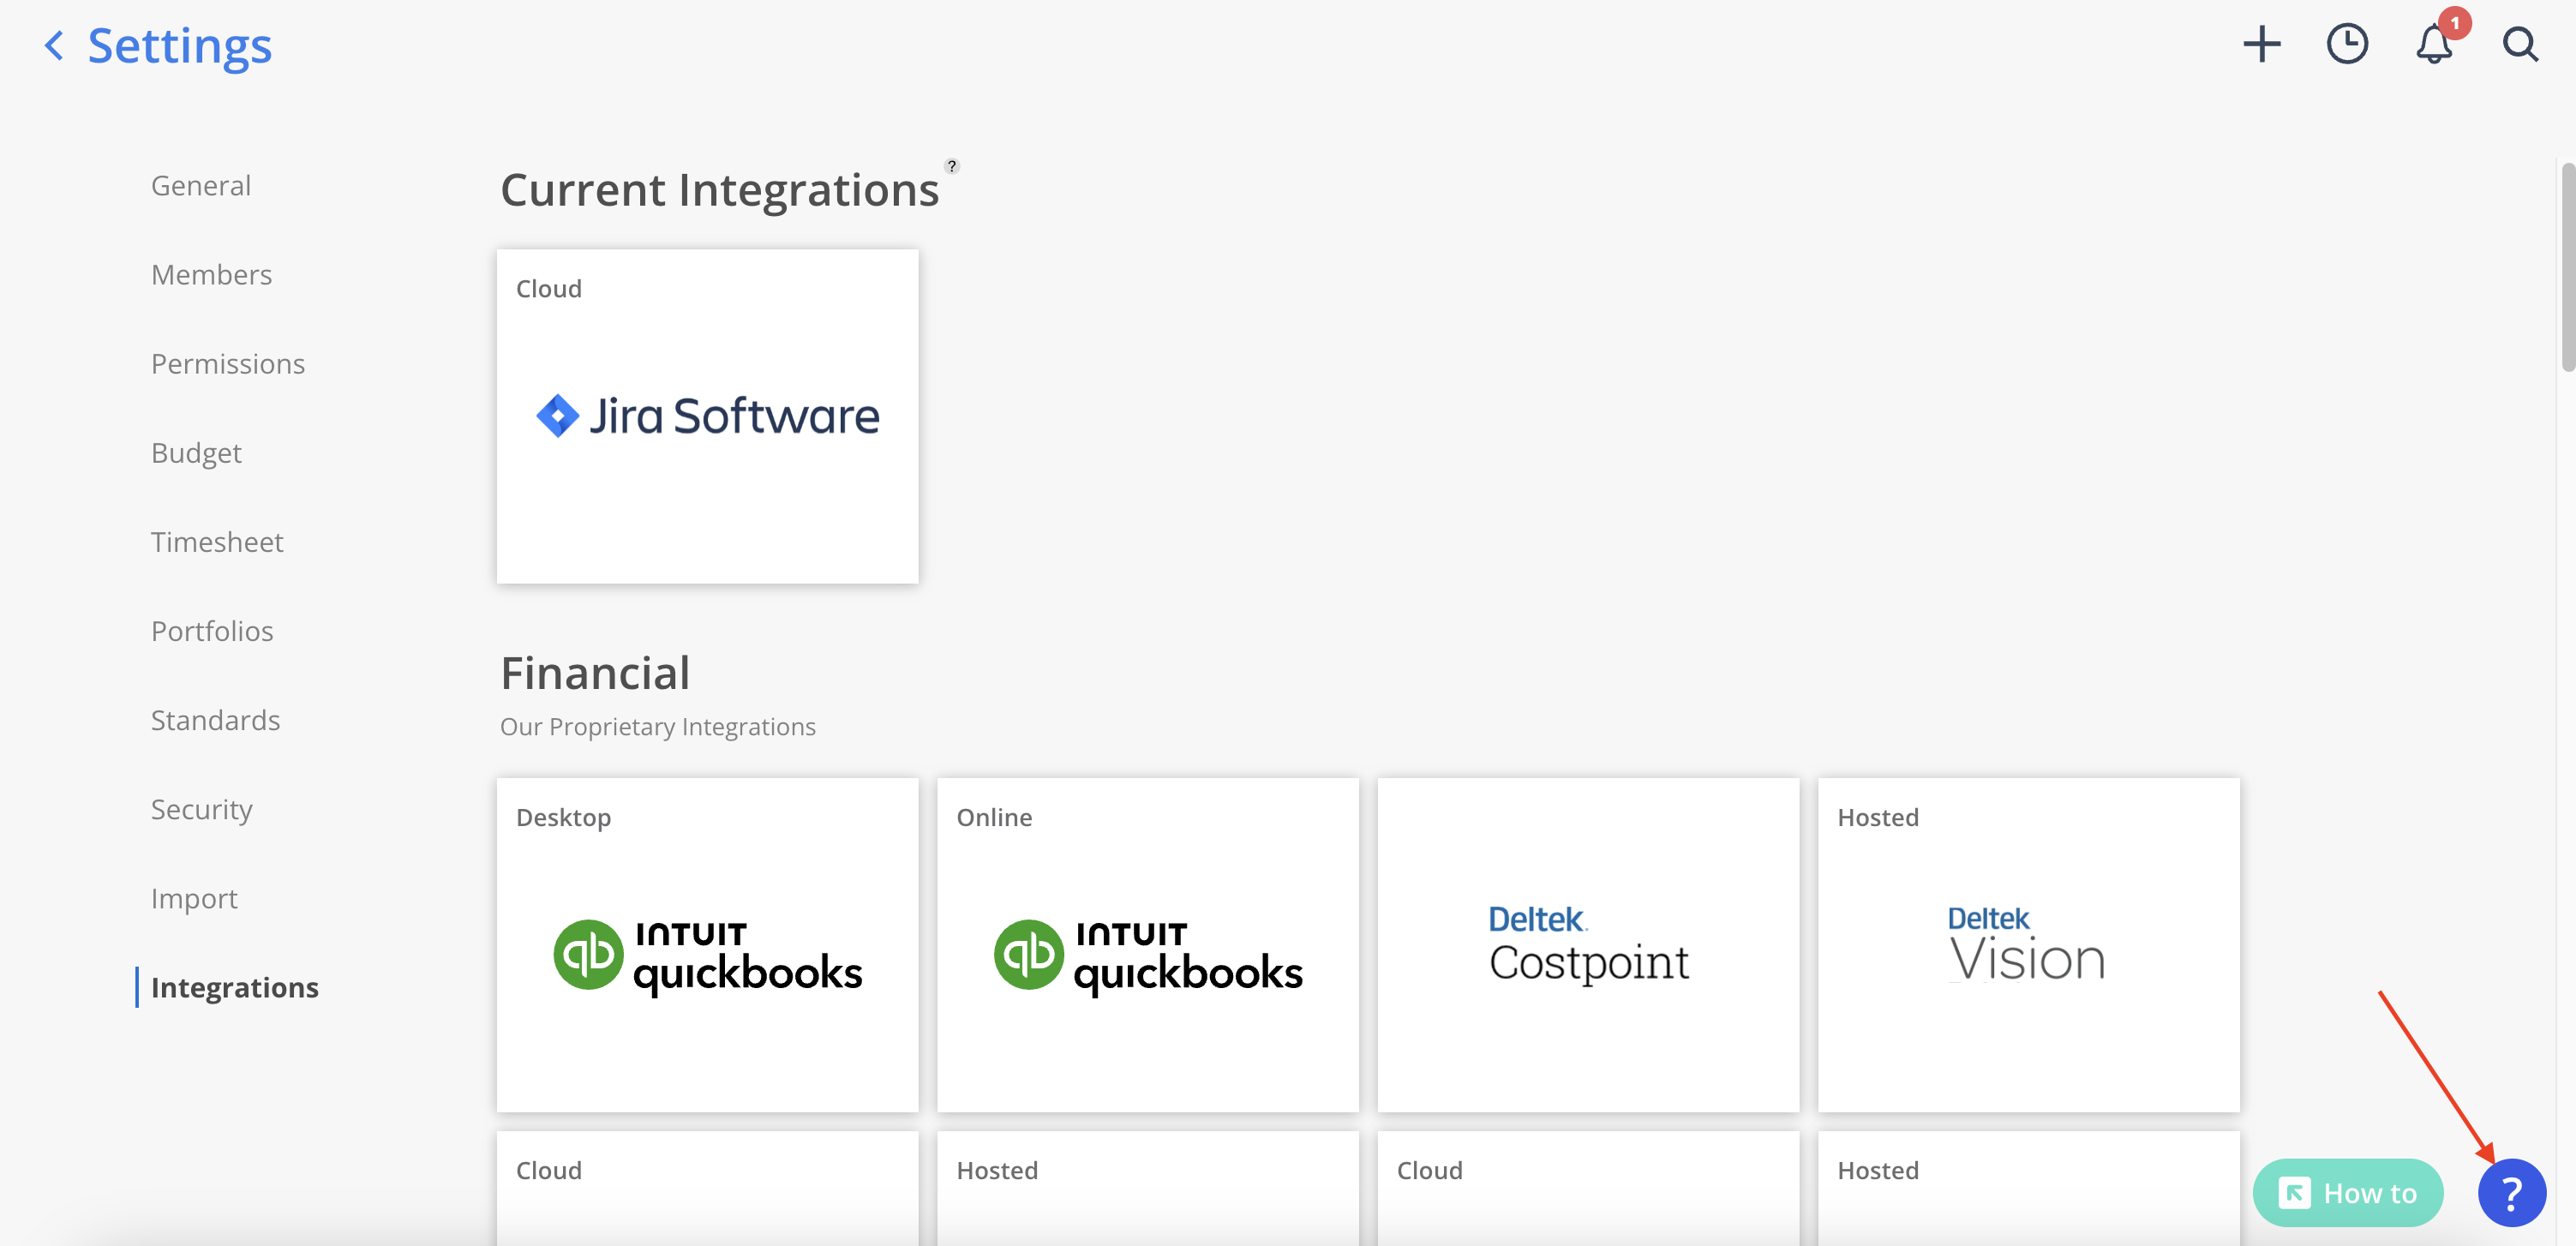
If you have no integrations set up:
- If you have no integrations set up, you will see a list of applications that we currently integrate with, or are working on. If you are interested in setting up an integration, please reach out to support via the support bubble in the bottom right:
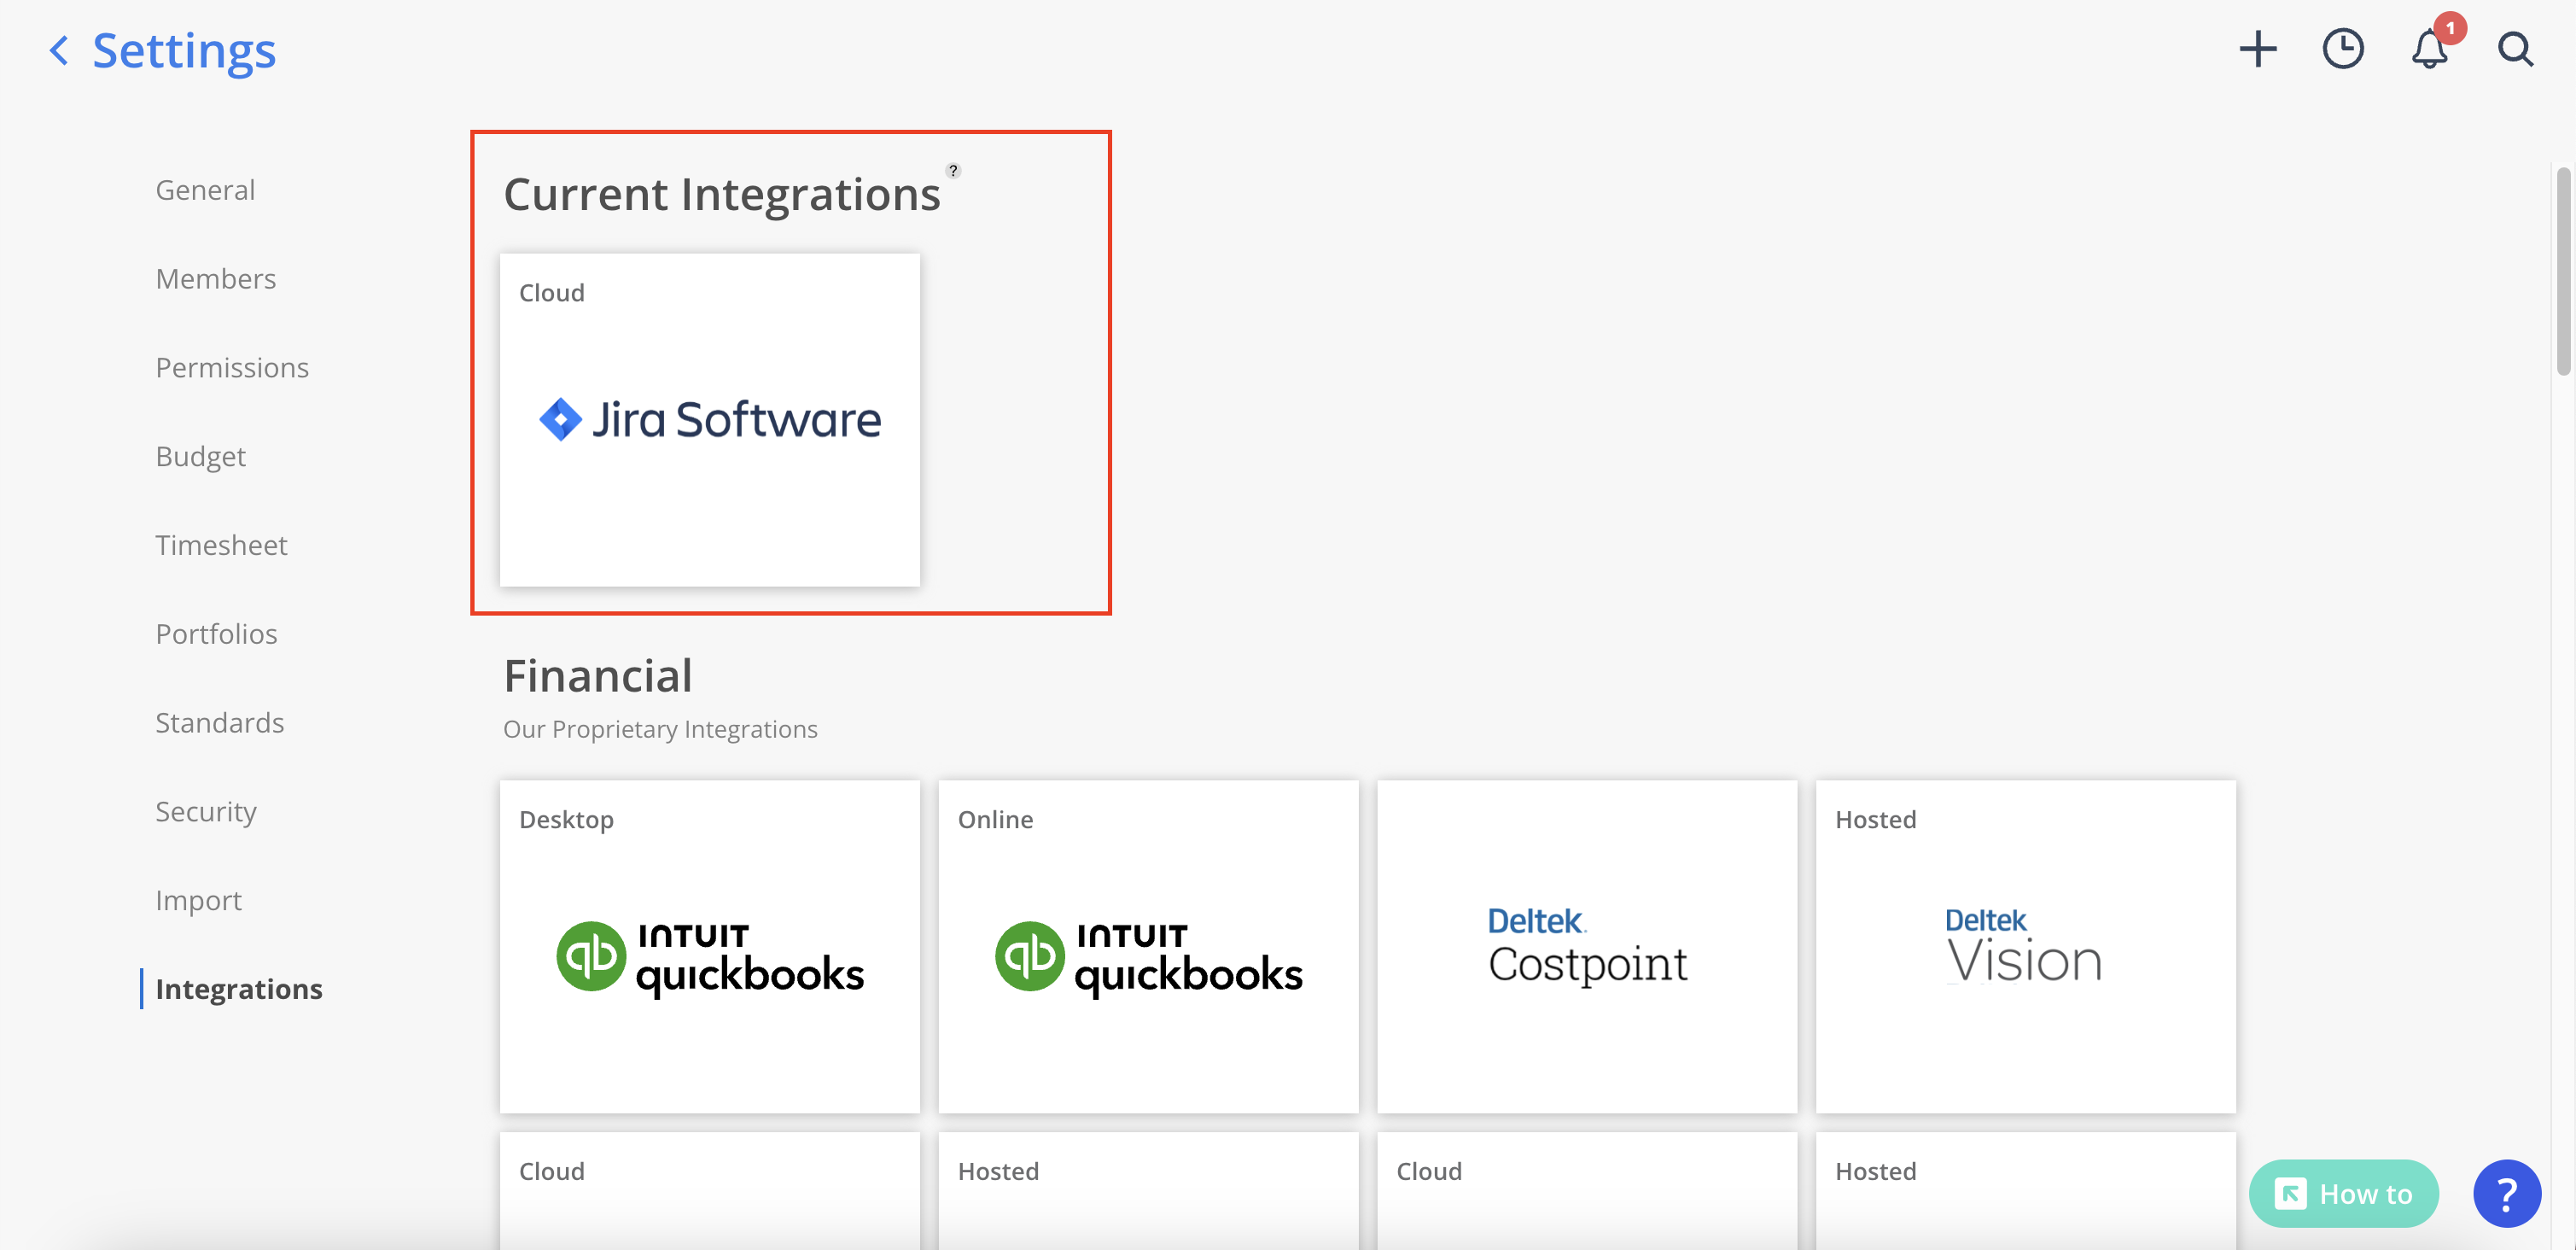
If you have multiple integrations set up:
- If you have multiple integrations you will see a list of your current integrations at the top of the screen. From here, you can select one to navigate to each integration's settings.
Integration Settings Overview
Once you navigate into your specific integration settings page, you will be able to import and link projects from that integrated application into Mosaic.
Manually Importing Data (e.g., a new project not in Mosaic):
In this example we are importing a project, although the steps are similar for other data types.
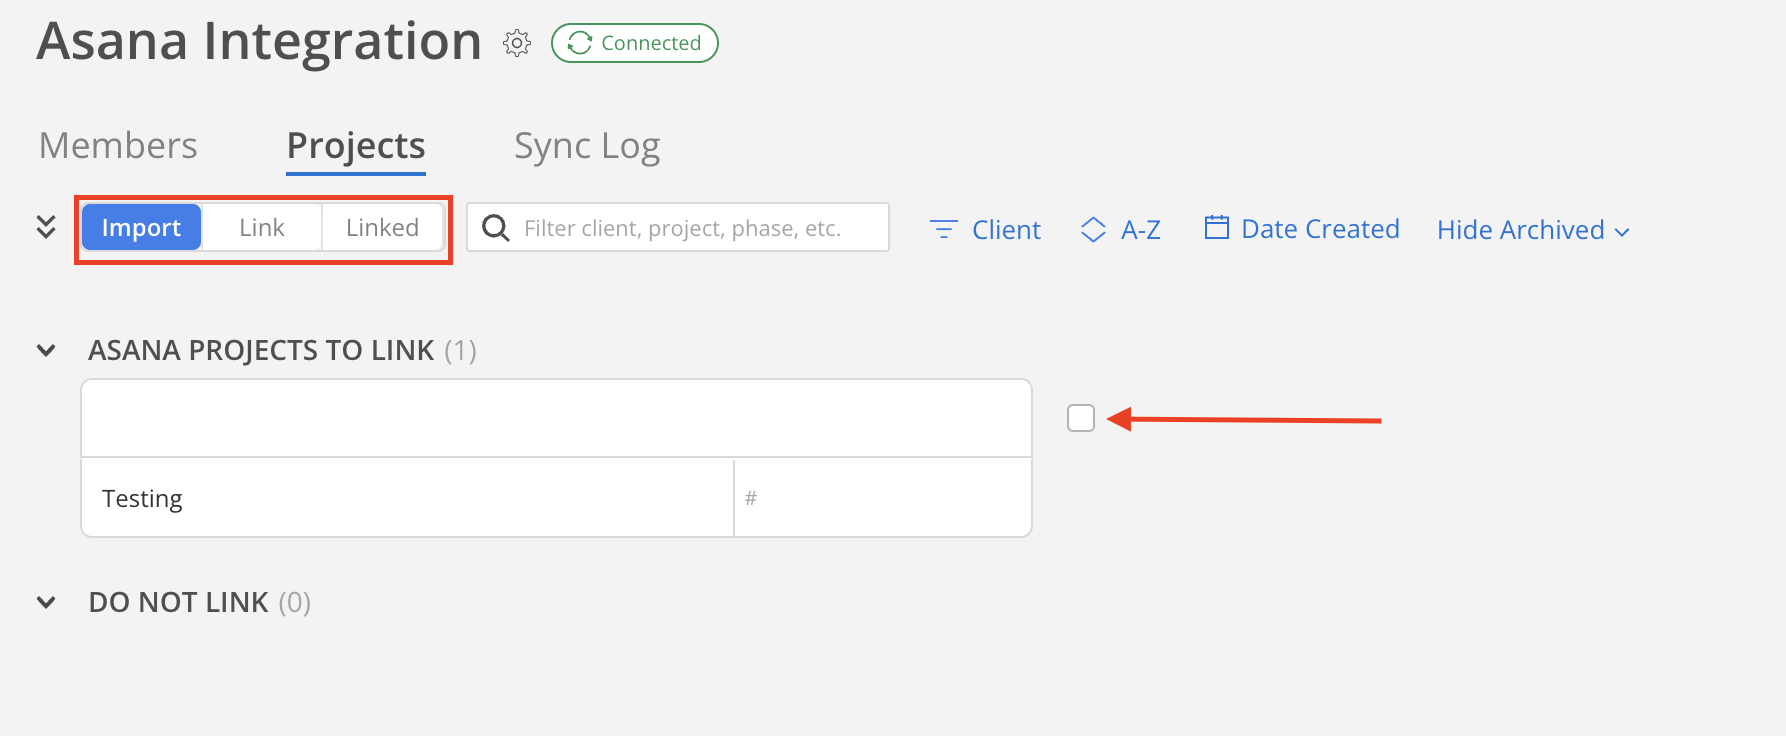
- Select the Import tab from the tabs shown below.
- Navigate to the Project you want to Import.
- Select the checkbox to the right of the Project as shown by the arrow below.
- (Optional) Select more Projects.
- Select
Import (1) as new.This number will change to reflect however many Projects you selected.
- That's it! Navigate to the 'Linked' tab to check that the project has been imported successfully.
Note: Depending on the integration you selected you may see a variety of data types you can select from and import, in the picture below we have the Asana integration which only has 'Projects' and 'Members' Data types, but expect to see different data types for others.
Manually Linking Data between Mosaic and Your Integrated Application (e.g., a project that already exists in Mosaic and your integrated application).
In this example we are importing a project, although the steps are similar for other data types.
- Select the Link tab from the tabs shown above.
- Navigate to the Project you want to Link.
- Select the plus to the right of the Project as shown by the arrow below.
- (Optional) Select more Projects.
- Select a pre-existing project in Mosaic to link to.
- Select Save.
There may be a pop up warning you about linked timesheets being imported. If there are timesheets linked that you would not like to bring over, then you should not link, otherwise select 'Yes, Link project'.
- That's it! Navigate to the 'Linked' tab to check that the project has been imported successfully.
General Integration Settings
Auto Import Projects and Phases
The Auto Import feature allows projects to automatically link and upload into Mosaic without having to manually link each one as above. For companies with a large amount of projects, the importing and linking process can be long and tedious, the auto-import feature helps to streamline this process.
By default, Auto-Import allows for up to three project layers to be linked: Project, Phase, Work Category.If your projects in your integrated application use more than 3 layers (eg. Ajera offers up to 6 layers) please contact your Customer Success Manager to confirm you have subphases enabled before trying to set up this feature.
Auto Import can be turned on in the Integrations tab as follows:
- Select the cog next to the integration name as shown below:

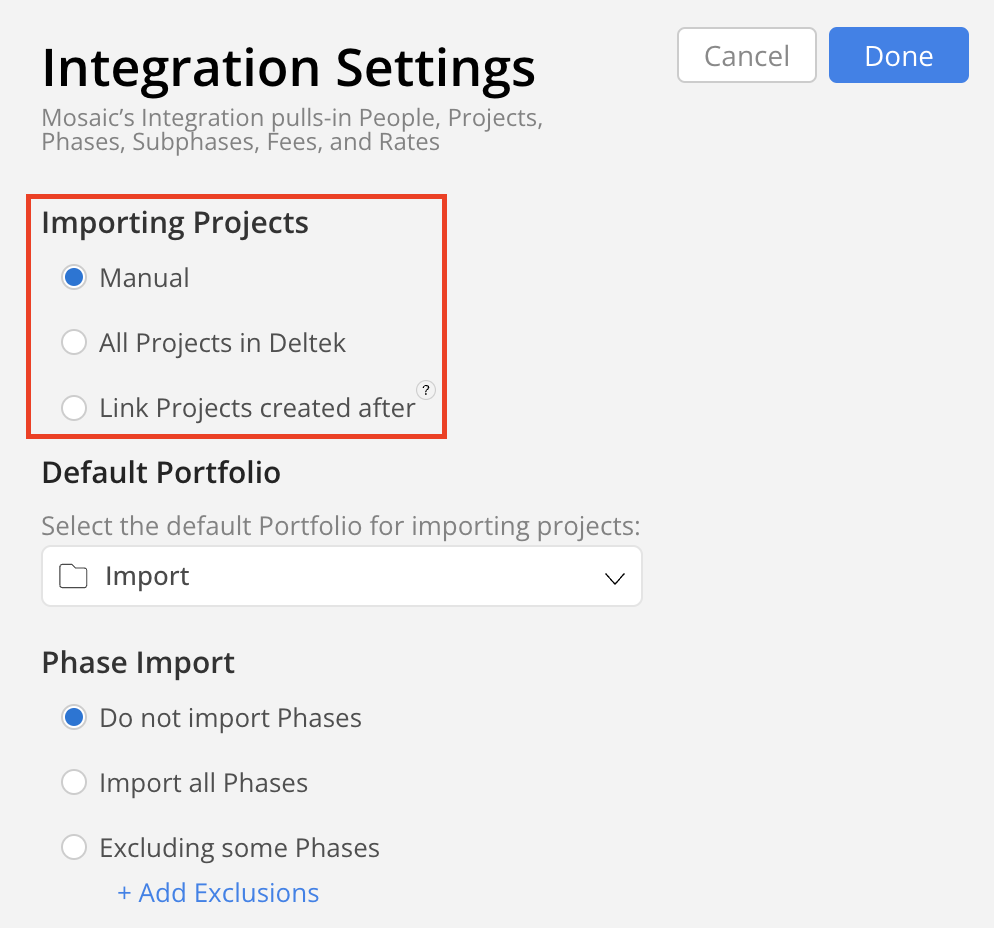
Auto Importing Projects
- If you would like to auto-import all your projects, select
All Projects in <Integration>. - If you would like to auto-import projects created after a specific date, select
Link Projects created afterand choose the desired date.
Unsupported IntegrationsThe
Link Projects created afteroption is not supported for the following integrations:
Vista, CSV, Ajera, Costpoint, Office365, and BST.
Default Portfolio
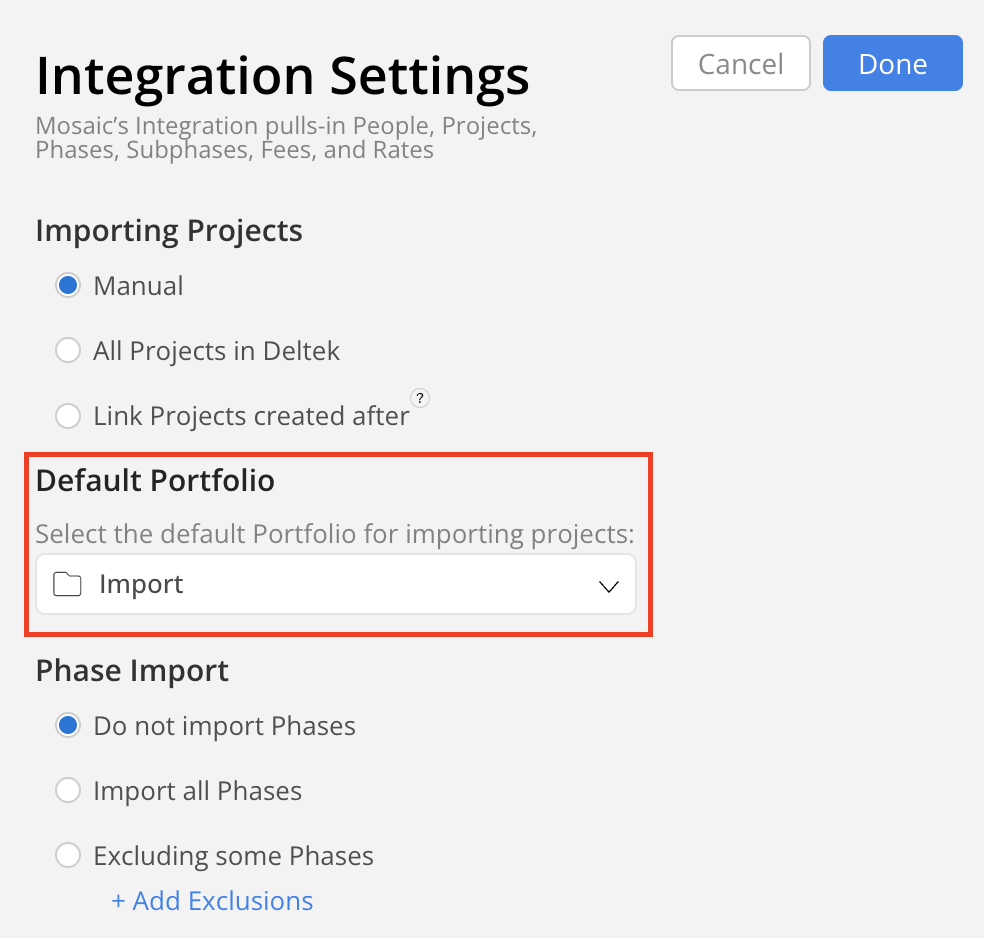
- Select the Portfolio you would like projects imported into
- By default, Mosaic imports new projects into the
Importportfolio.
Auto Import Phases
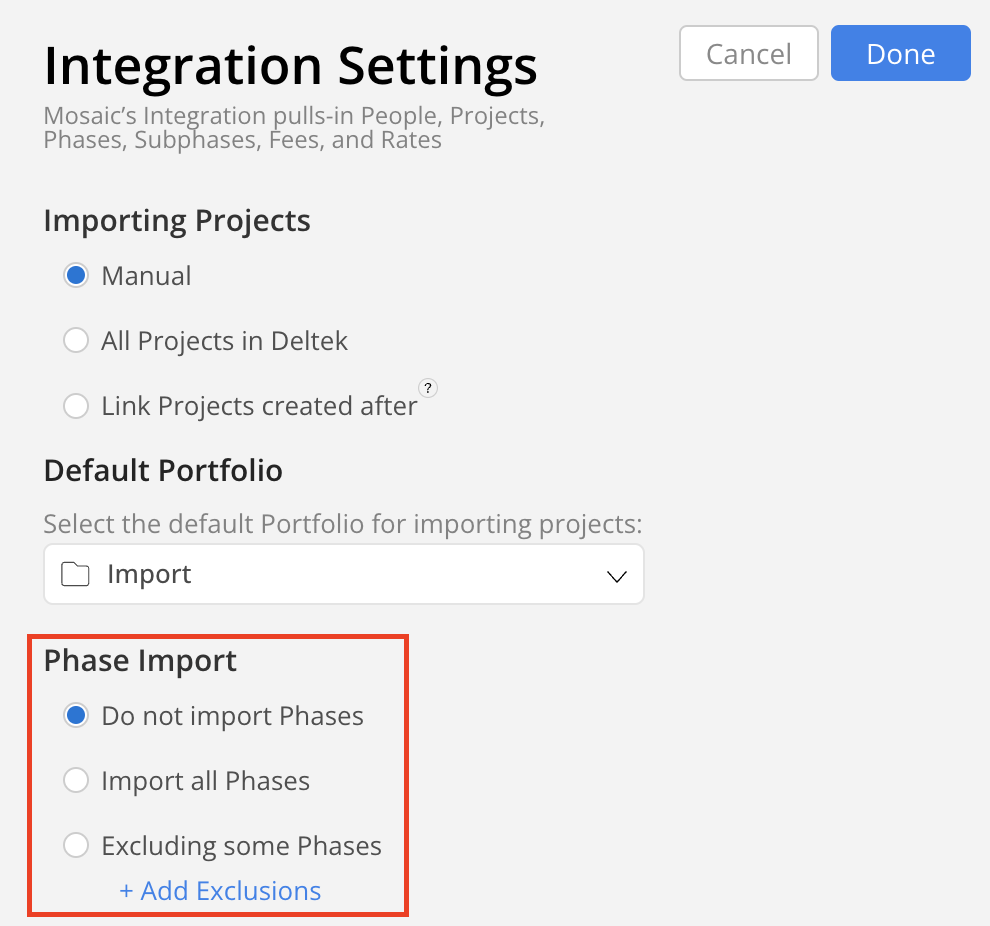
- If you would like phases to be automatically imported (rather than linking each one manually) select the 'Import all Phases' option below
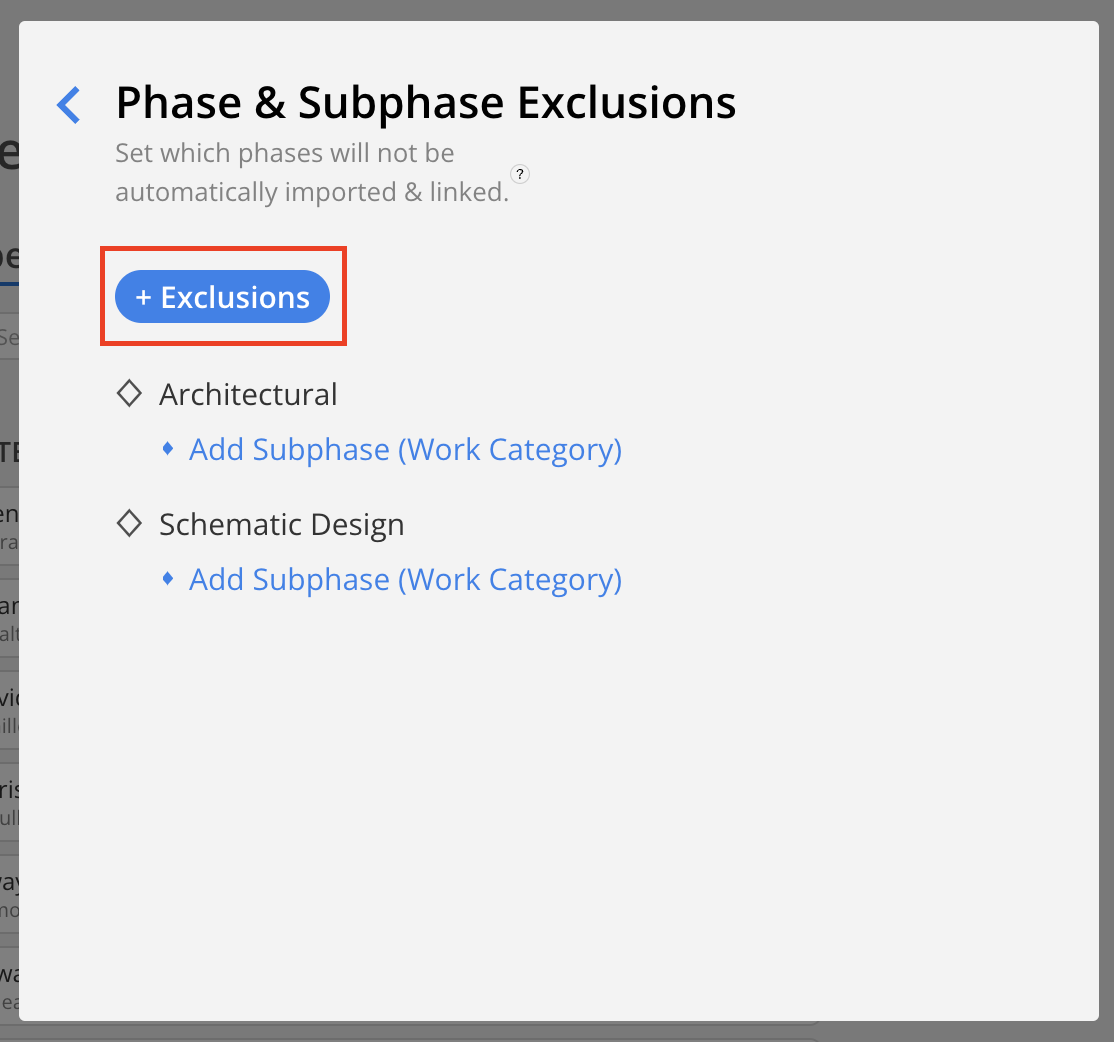
To exclude some Phases in Auto Import:
- (Optional) If you have Phases that you would not like to automatically import, you can instead select
Excluding some Phases”and add the phases you would like to exclude from the Auto Import. - For more information, please refer to the Phase Exclusions guide.
Auto Import Work Categories
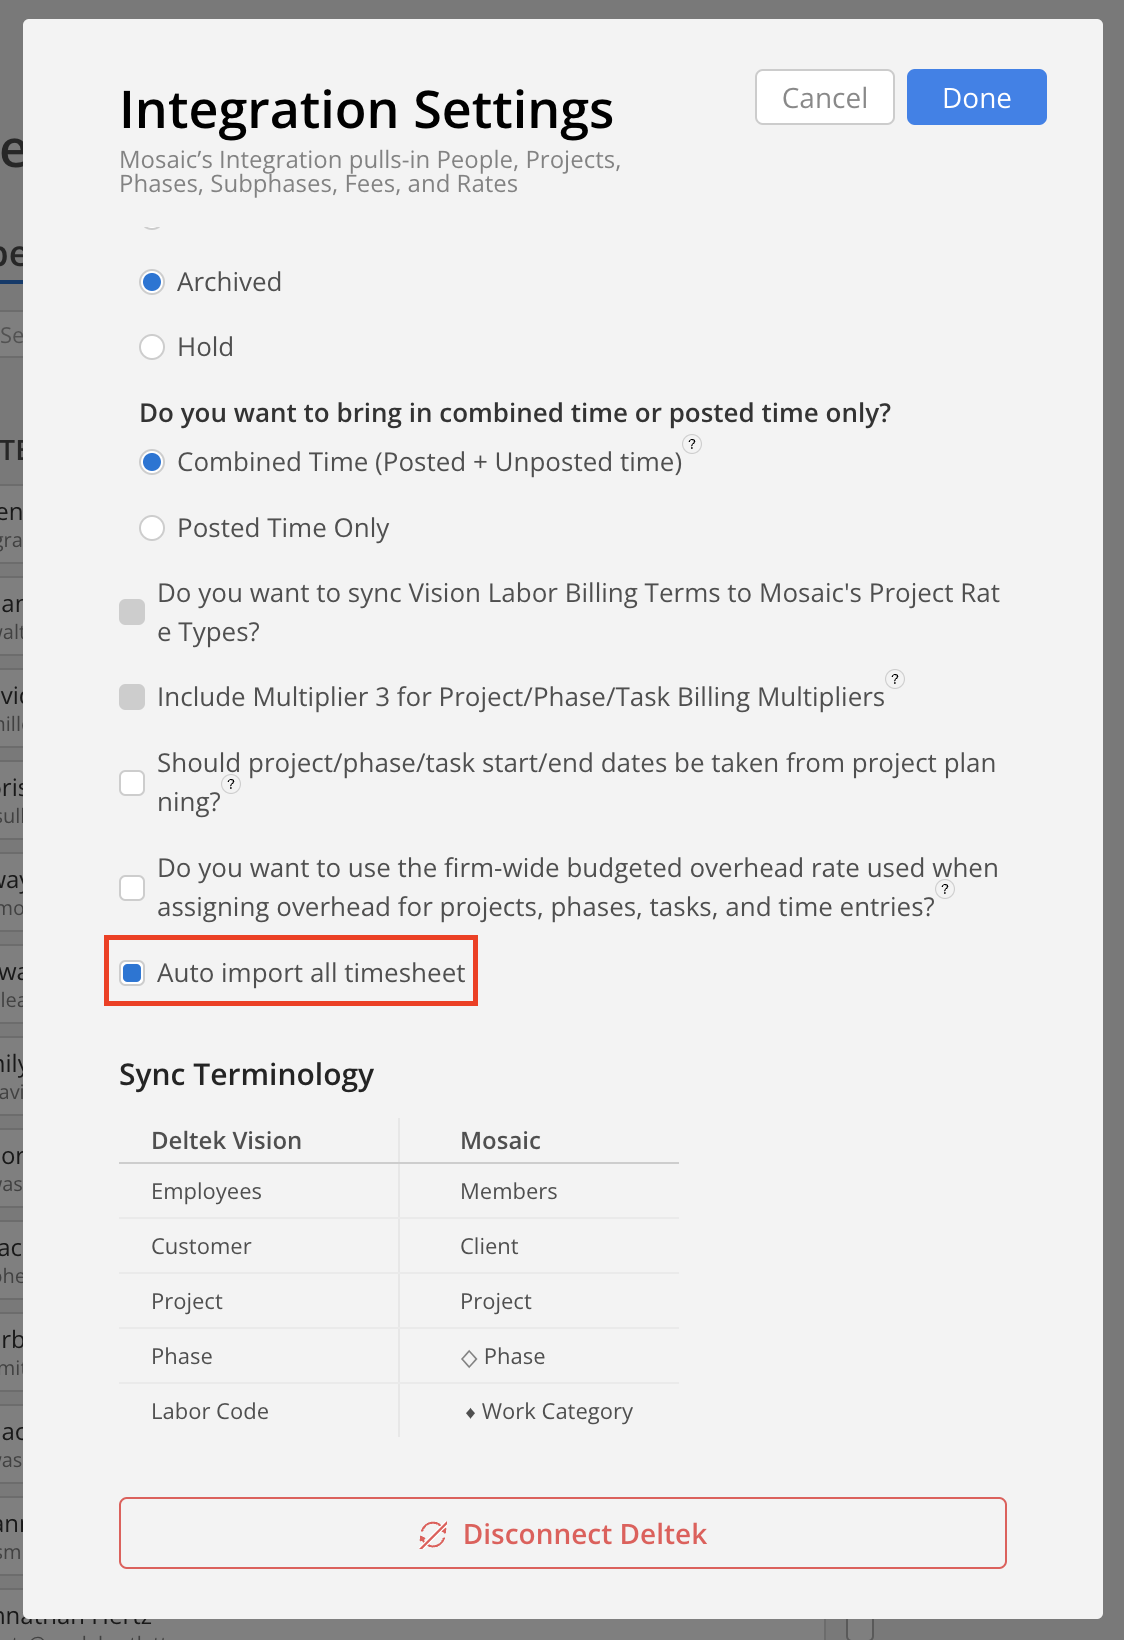
- This feature allows Work Categories to automatically link and upload into Mosaic without having to manually link each one.
- For companies with a large amount of Work Categories - also know as Service Items (QuickBooks) or Labor Codes (Deltek), the importing and linking process can be long and tedious, the Auto import all timesheet feature helps to streamline this process.
Phase and Project Titles
You can configure titles to either match your source ERP or allow modifications directly in Mosaic via integration settings. These settings apply only to future imports and are not retroactive.
Option 1: Titles on Mosaic will be overwritten by ject/Phase changes Project/Phase changes
- Behaviour: Titles in Mosaic are automatically updated to match the source ERP.
- When to Choose:
- Consistency with the source ERP is critical.
- The source ERP is the single source of truth for titles.
- You want Mosaic to reflect updates from the source ERP automatically.
Option 2: Titles on Mosaic will not be overwritten by ject/Phase changes Project/Phase changes
- Behaviour: Titles in Mosaic remain as-is, even if they differ from the source ERP.
- When to Choose:
- Flexibility to edit titles directly in Mosaic is needed.
- Mosaic titles should be independent of the source ERP.
- Manual adjustments to Mosaic titles are common and must be preserved.
Sending Budgets from Integrations
For billable phases, the Budget can be configured in Mosaic by either direct entry or as a percentage. For more information, refer to the Help Docs.
If your ERP integration supports Fees, the Fee can be used as the Budget for non-billable phases via the Integration Settings > Send non-billable phase fee as budget setting.

Project Link Statuses
Main Project Phase
- For Projects without Phases, making the
Main Project a Phaseallows time entries to sync directly under the project from the ERP to Mosaic.
Use Make Main Project a Phase when:
- Scenario 1: You do not have phases on either the Integration project or the Mosaic project.
- This syncs time entries directly under the Mosaic project to the Integration project (and vice versa). Use this when you expect to add time to the main project.
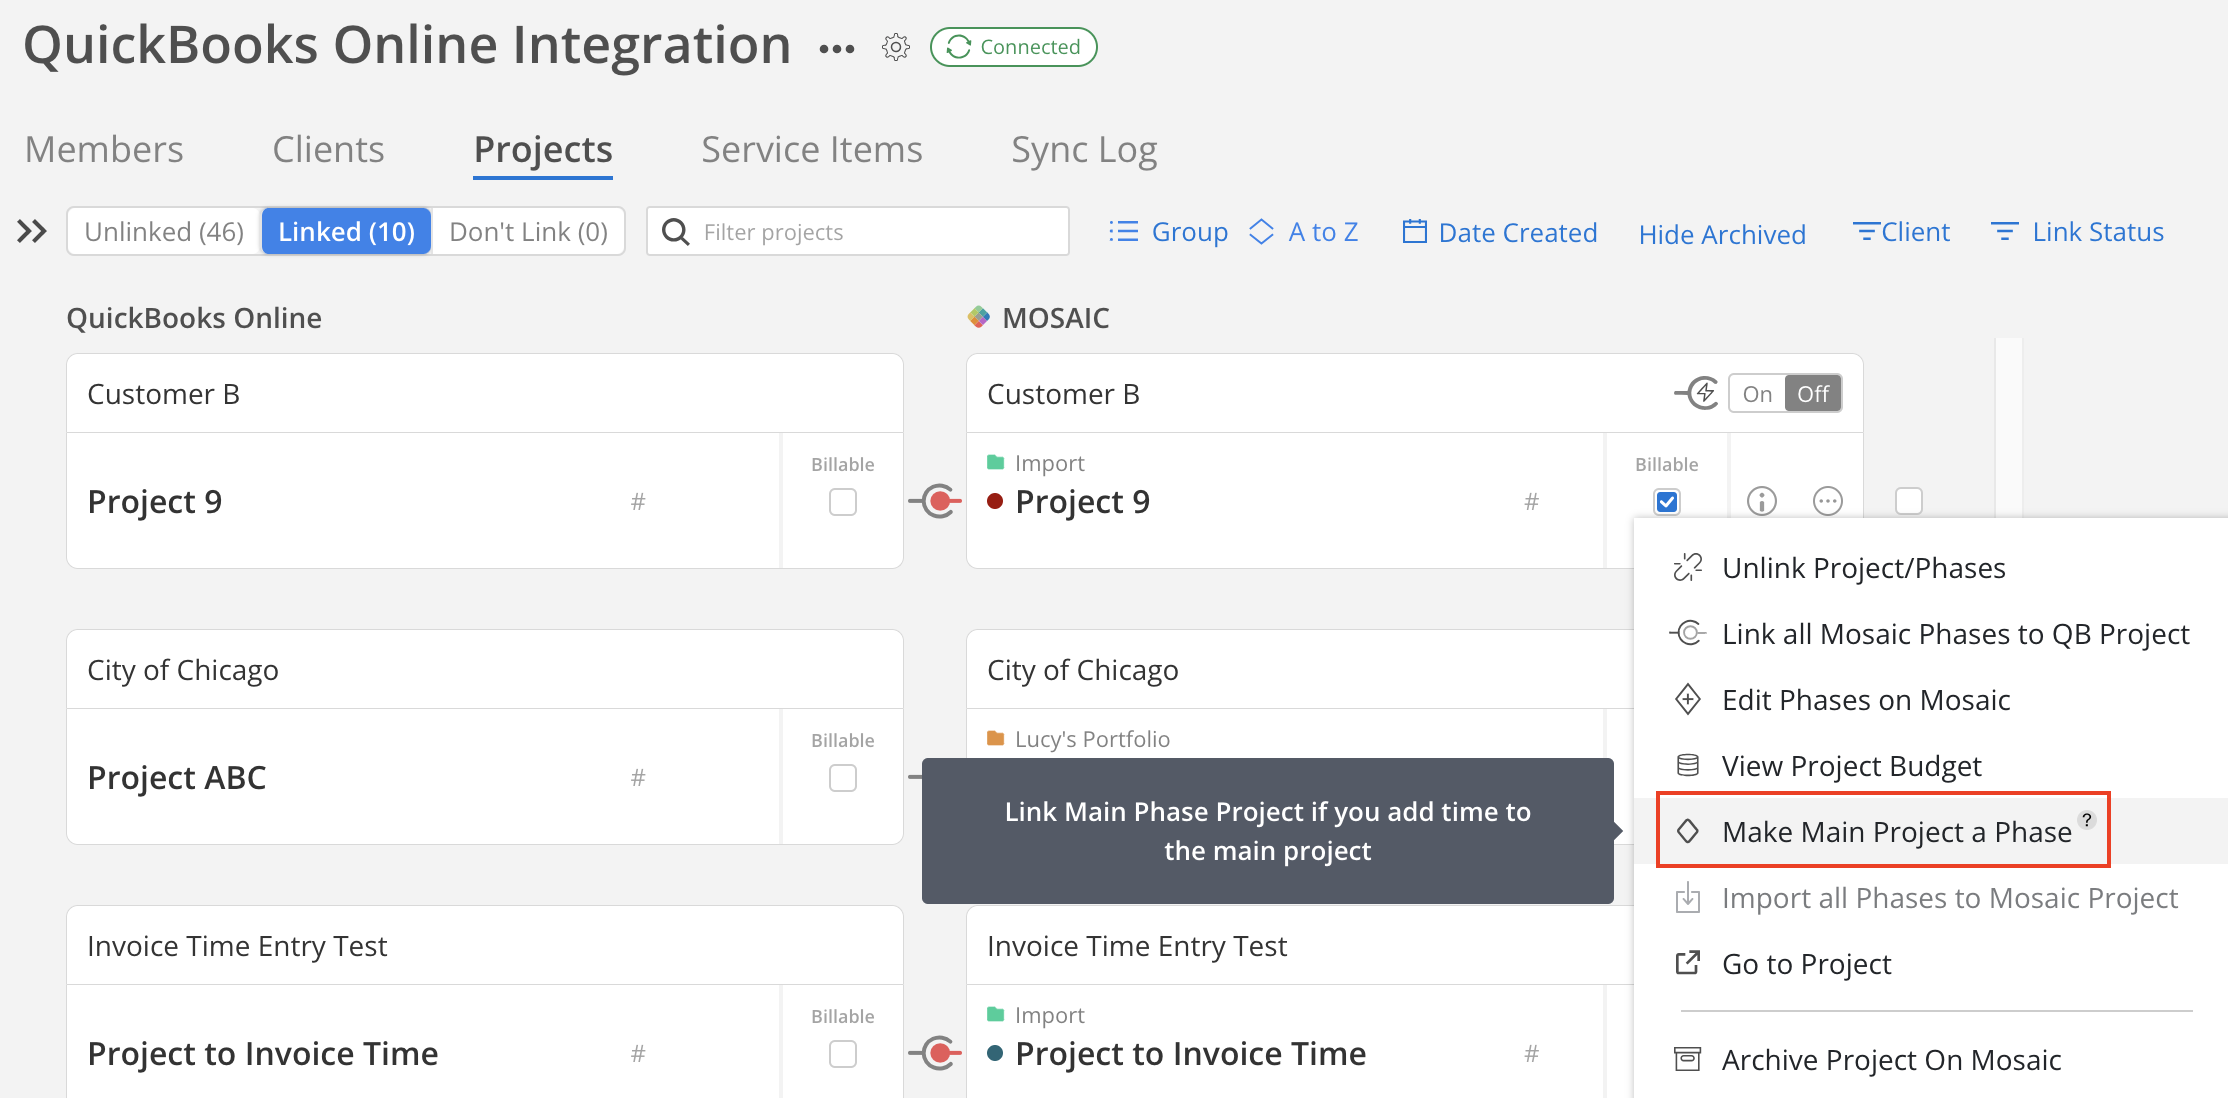
Please Note:If you select
Make Main Project a Phase, time entries entered directly under the project in the ERP will sync to a default phase on the Mosaic project (and vice versa for QuickBooks).This default phase is not visible on the Integration Settings > Projects tab, but it is visible in the Project Budget modal, individual time entries, etc.
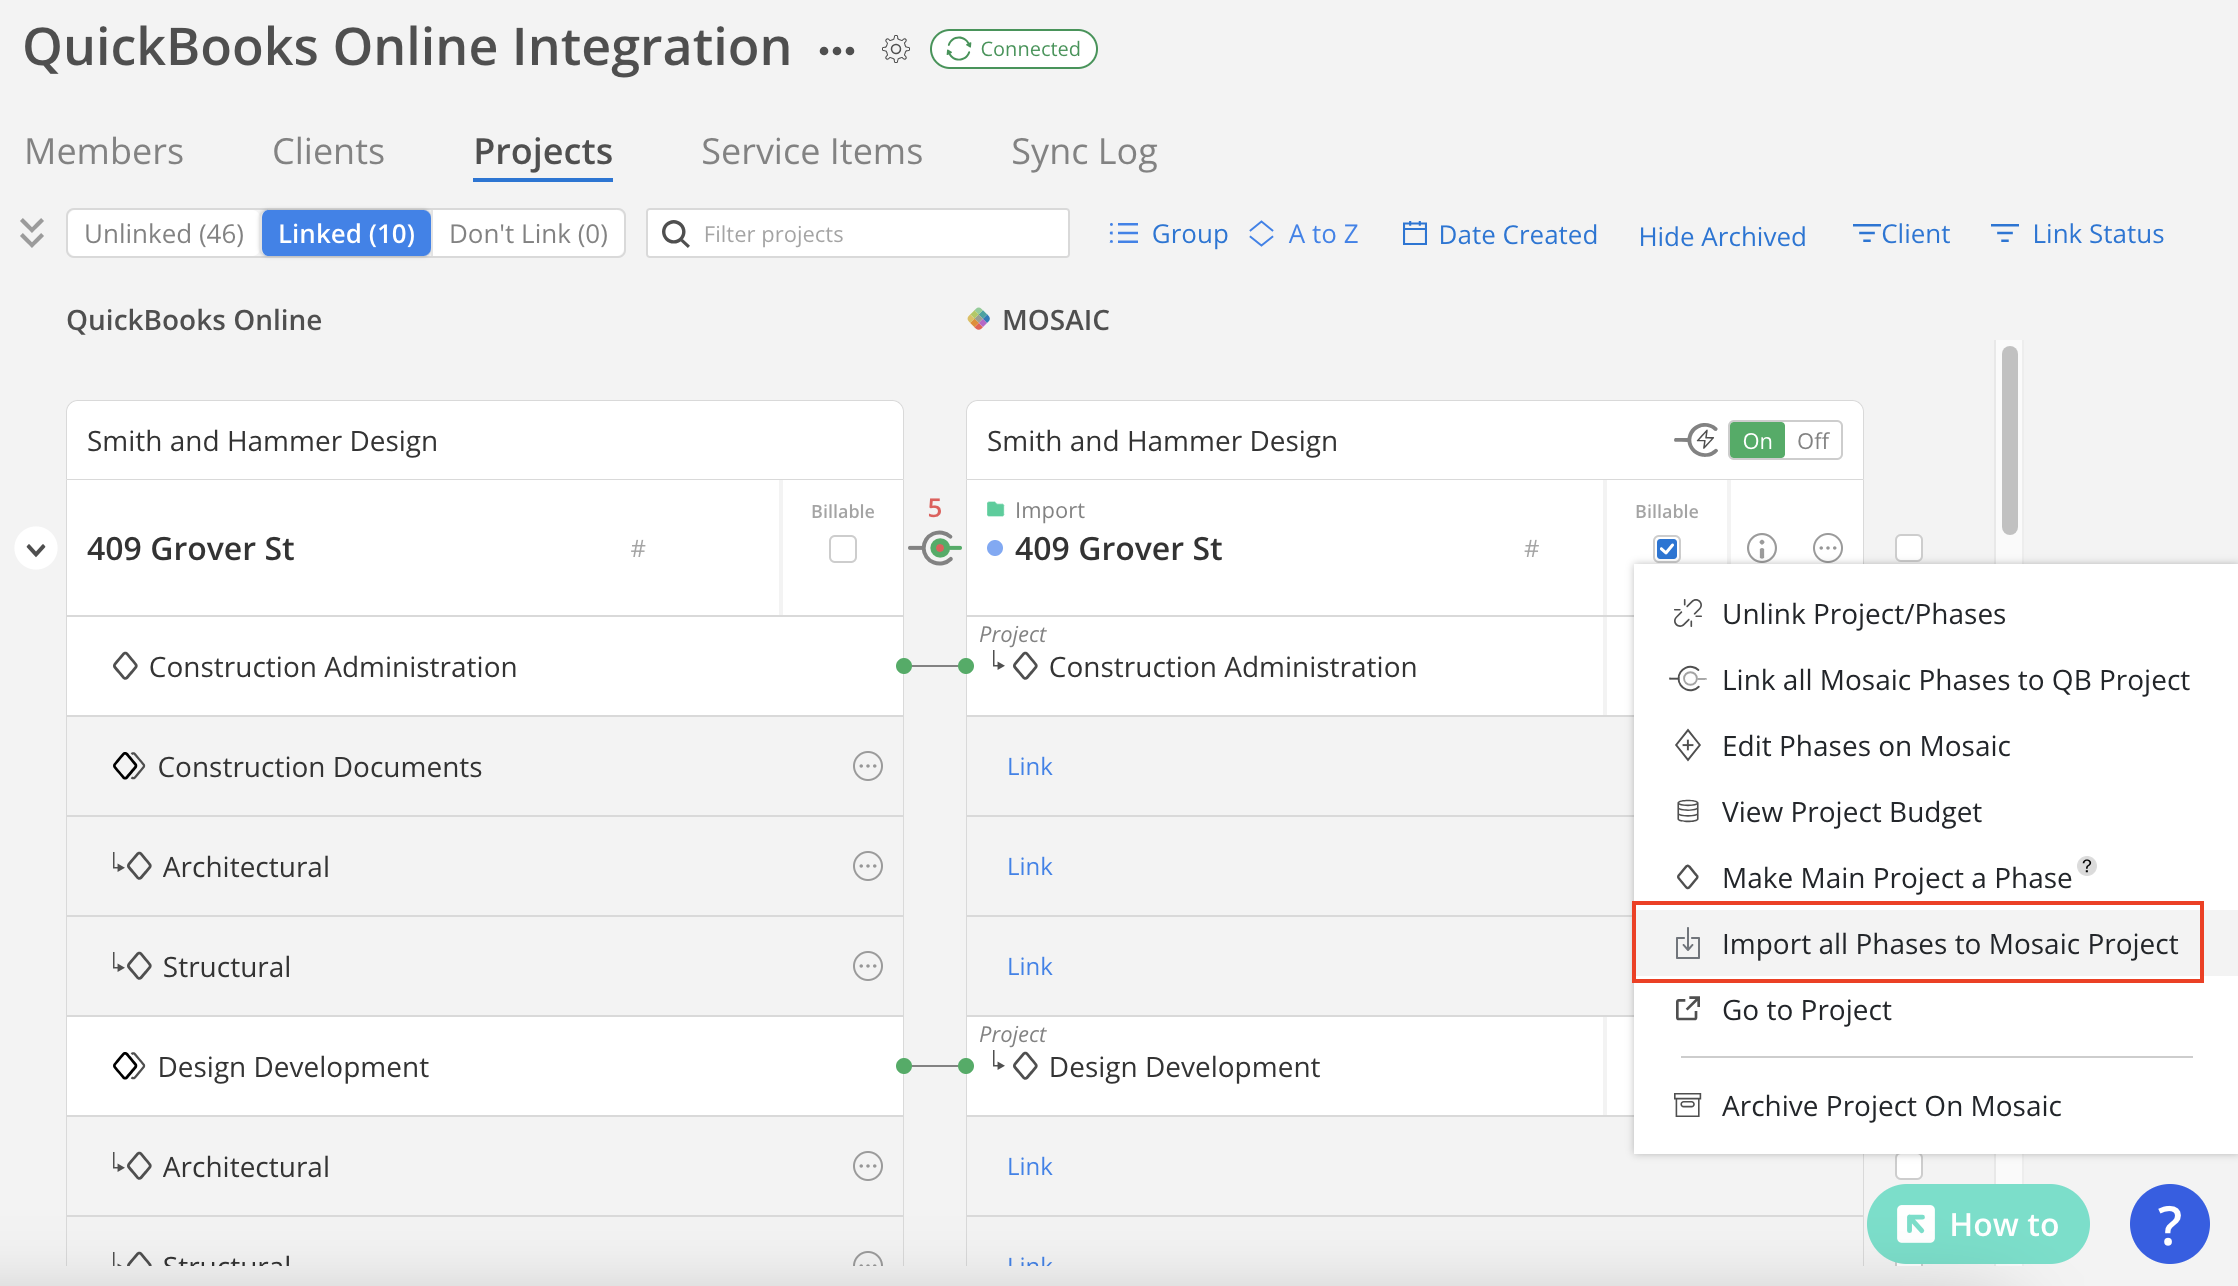
Import all phases to Mosaic Project
Use Import all Phases to Mosaic Project when there are phases on the Integration Project that have not yet been imported to Mosaic.
This syncs time entries under all Phases in the ERP to the corresponding Phases in Mosaic.
How to check if your Project is linked
- A Green Link Icon indicates that all phases are linked or that the main project is a phase (for projects without phases).

- A Green and Red Link Icon indicates that some phases are linked. Hover over the tool tip to see the number of linked and unlinked phases.
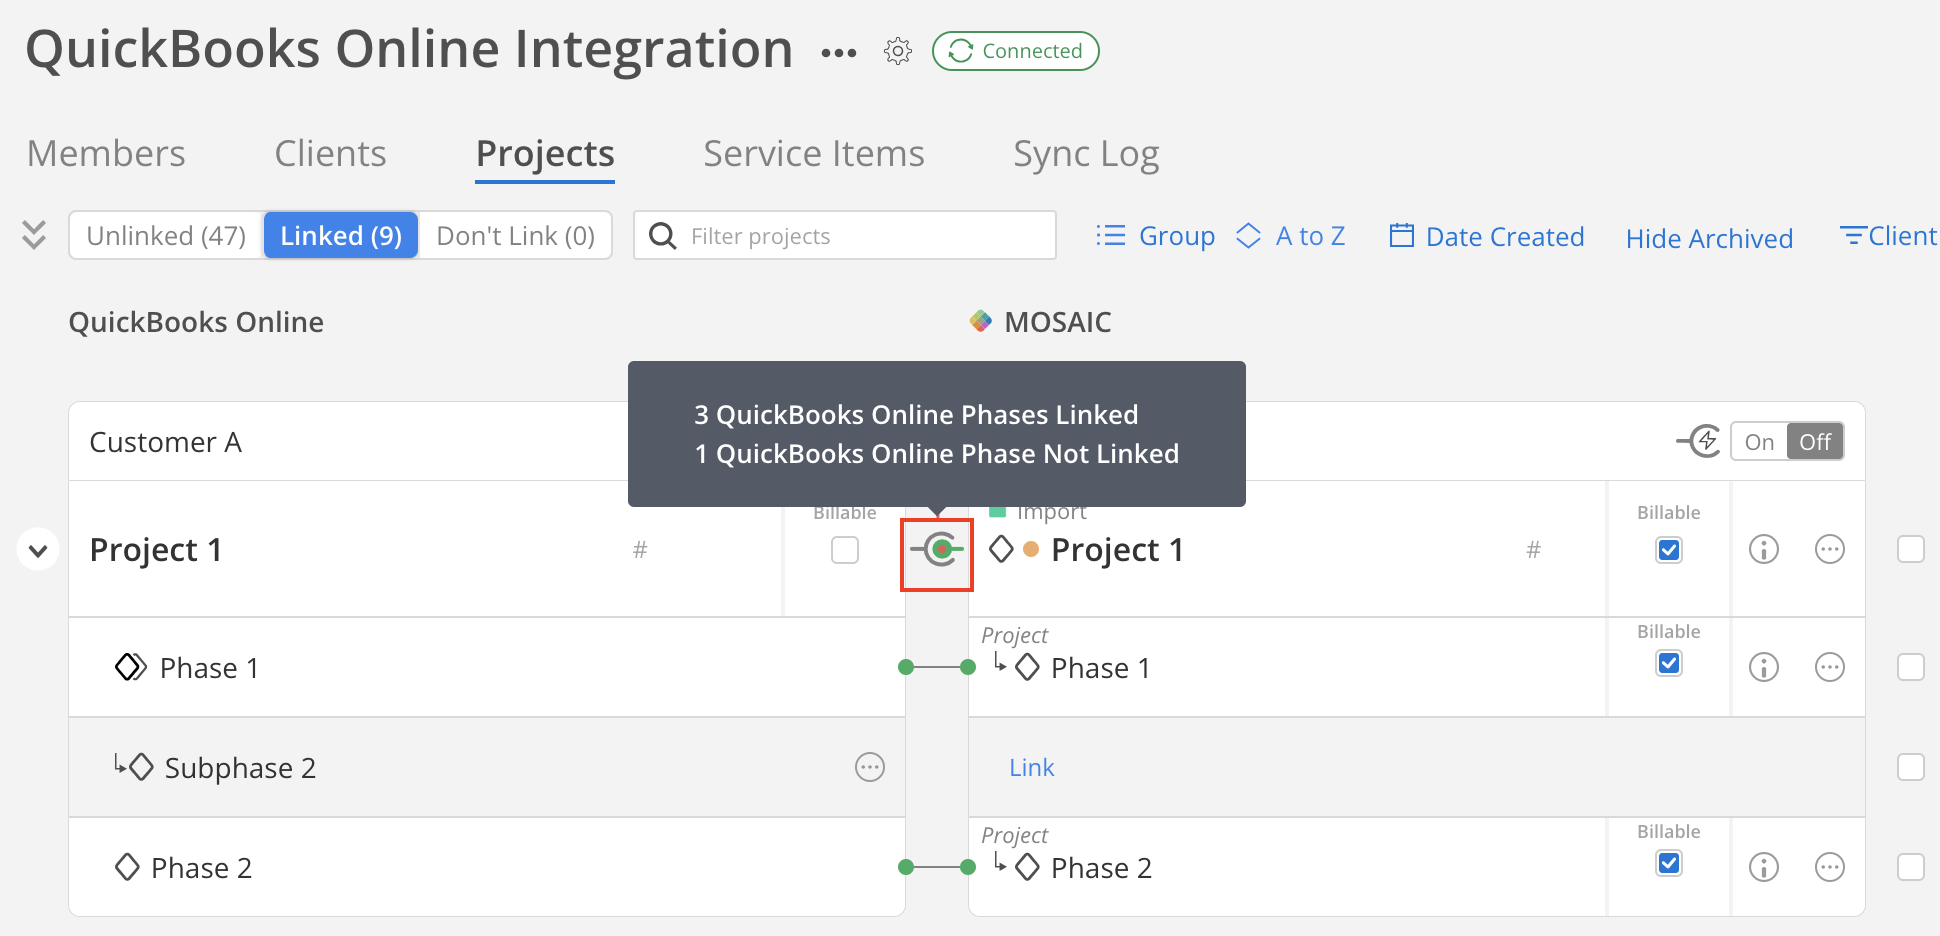
- A Red Link Icon indicates that none of the phases are linked, or the main project is not a phase.
Please Note: No time entries will sync between the Integration project and the Mosaic project if you see a Red Link Icon.

To resolve, you can:
Updated 4 months ago
