Uploading Employees
While Mosaic can be used to input employees (members), members can also be uploaded from other tools to Mosaic for complete budgets and details on the progress of your projects.
Download the Sample FileBefore uploading, download the import template to ensure a smooth upload process.
To upload members:
-
Confirm either Mosaic Support or your Customer Success Manager have enabled the members upload tool on your account. To request this tool be added to your account, reach out to our team via [email protected]
-
Next, fill out the members information on the template csv file download here
Please Note:Ensure your data is accurate and all employee names are spelled correctly. Employees will be created exactly as you’ve entered them on the import template.
Ensure employee information is consistent throughout the import template. For example, discrepancies like the following will create duplicates:
- Employee: Benjamin Smith v Ben Smith
If Mosaic is integrated with your financial tool, ensure the names on the import template match what is in Mosaic.
Here is an overview of the details needed for each column:
| Field | Guide | Example | Required |
|---|---|---|---|
| Email of employee. | [email protected] | Yes | |
| First Name | First name of employee. | Robert | Yes |
| Last Name | Last name of employee. | Smith | Yes |
| Skip Invite | Whether you would like to send an invitation email to the employee to sign up on Mosaic.
If team-level notifications are turned off, members will receive an invitation if the "Skip Invite" field is set to false. | false | No |
| Employment Type | Employment types supported by CSV Data Import: Member (default), Contractor (Internal), and Project Contractor (External).
| Member OR Contractor (Internal) OR Contractor (External) | No |
| Role | The employee's role. | Marketing Coordinator | No |
| Rate Amount | Bill Rate (you can also add their Cost Rate once you are in Mosaic).
| 275 | No |
| Rate Description | Normally the employee's title.
| Partner | No |
| TO Hours | The amount of annual Time Off (TO) hours for that employee.
| 10 | No |
| TO Description | The description for the TO hours.
| This is a description | No |
| Discipline | The employee's discipline within the company.
| Functional Services | No |
| Office | You can only choose existing office locations within the team.
| New York | No |
| Region | The employee's primary region.
| US | No |
| Department | The employee's division within the company.
| Marketing | No |
| Skills | The employee's skills separated by a comma. The employee's skills separated by a comma. There is also an option to add a skill level by appending
| React, Node, Adobe Illustrator, Adobe Photoshop OR React:5, Node:3, Rails:2, Adobe Illustrator:5, Adobe Photoshop:5 | No |
Please Note:Member imports will only create additional roles and rates (if they don't exist on Mosaic), but it will not update or delete any existing roles or rates.
-
Export your completed members import file to the .csv format. Date fields work best in .csv formats.
-
Navigate to Company Settings -> Members, click the 3-dot menu, select Import Members, and then choose Upload to upload your .csv file. De-select the Automatic Field Mapping option to prevent columns from automatically mapping, thereby avoiding potential improper data imports.


- Select the file you would like to import using the file selector or drag and drop the file here.

-
After the file is uploaded, the system attempts to automatically map the required information. Mapped columns can be adjusted by selecting a different option from the dropdown. To exclude a column from the import, select
Don’t importto unmap it. Auto-population of data into the system fields may take a few moments to complete.

-
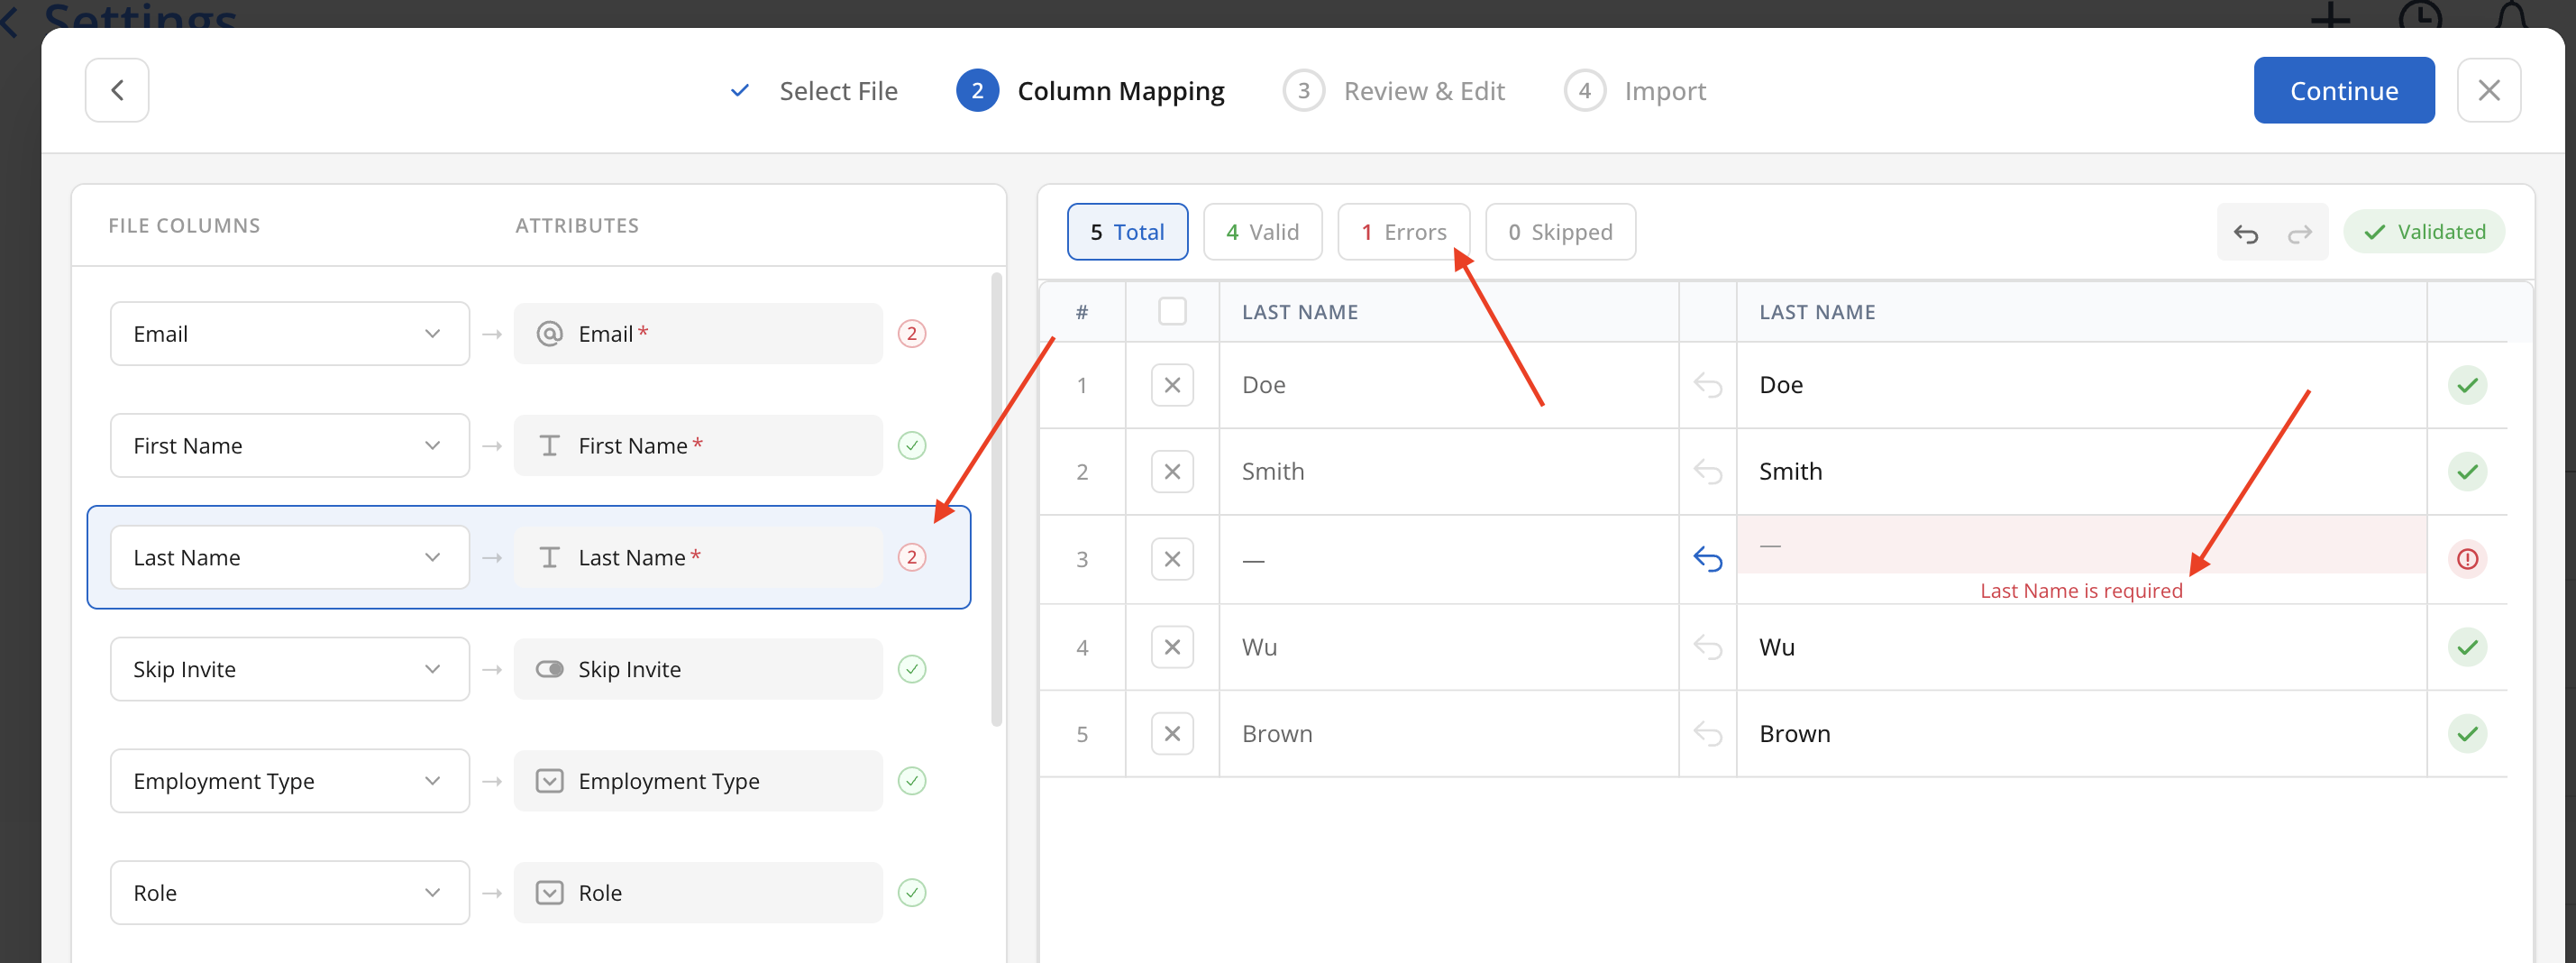
Click on the column to see all rows in that column.

Red Highlighted RowsRed highlighted rows indicate errors, which might be due to missing required fields, no matching values on Mosaic, or a typo. The number of errors is displayed next to the corresponding column name. Selecting a column shows all rows, with error rows highlighted in red and an error message displayed directly on the affected row. Please confirm if there is a typo, or if the value does not exist on Mosaic.
To view only rows with errors, select the Errors button at the top of the table.
If this is a typo, you can update the value in the uploader on the right side.
-
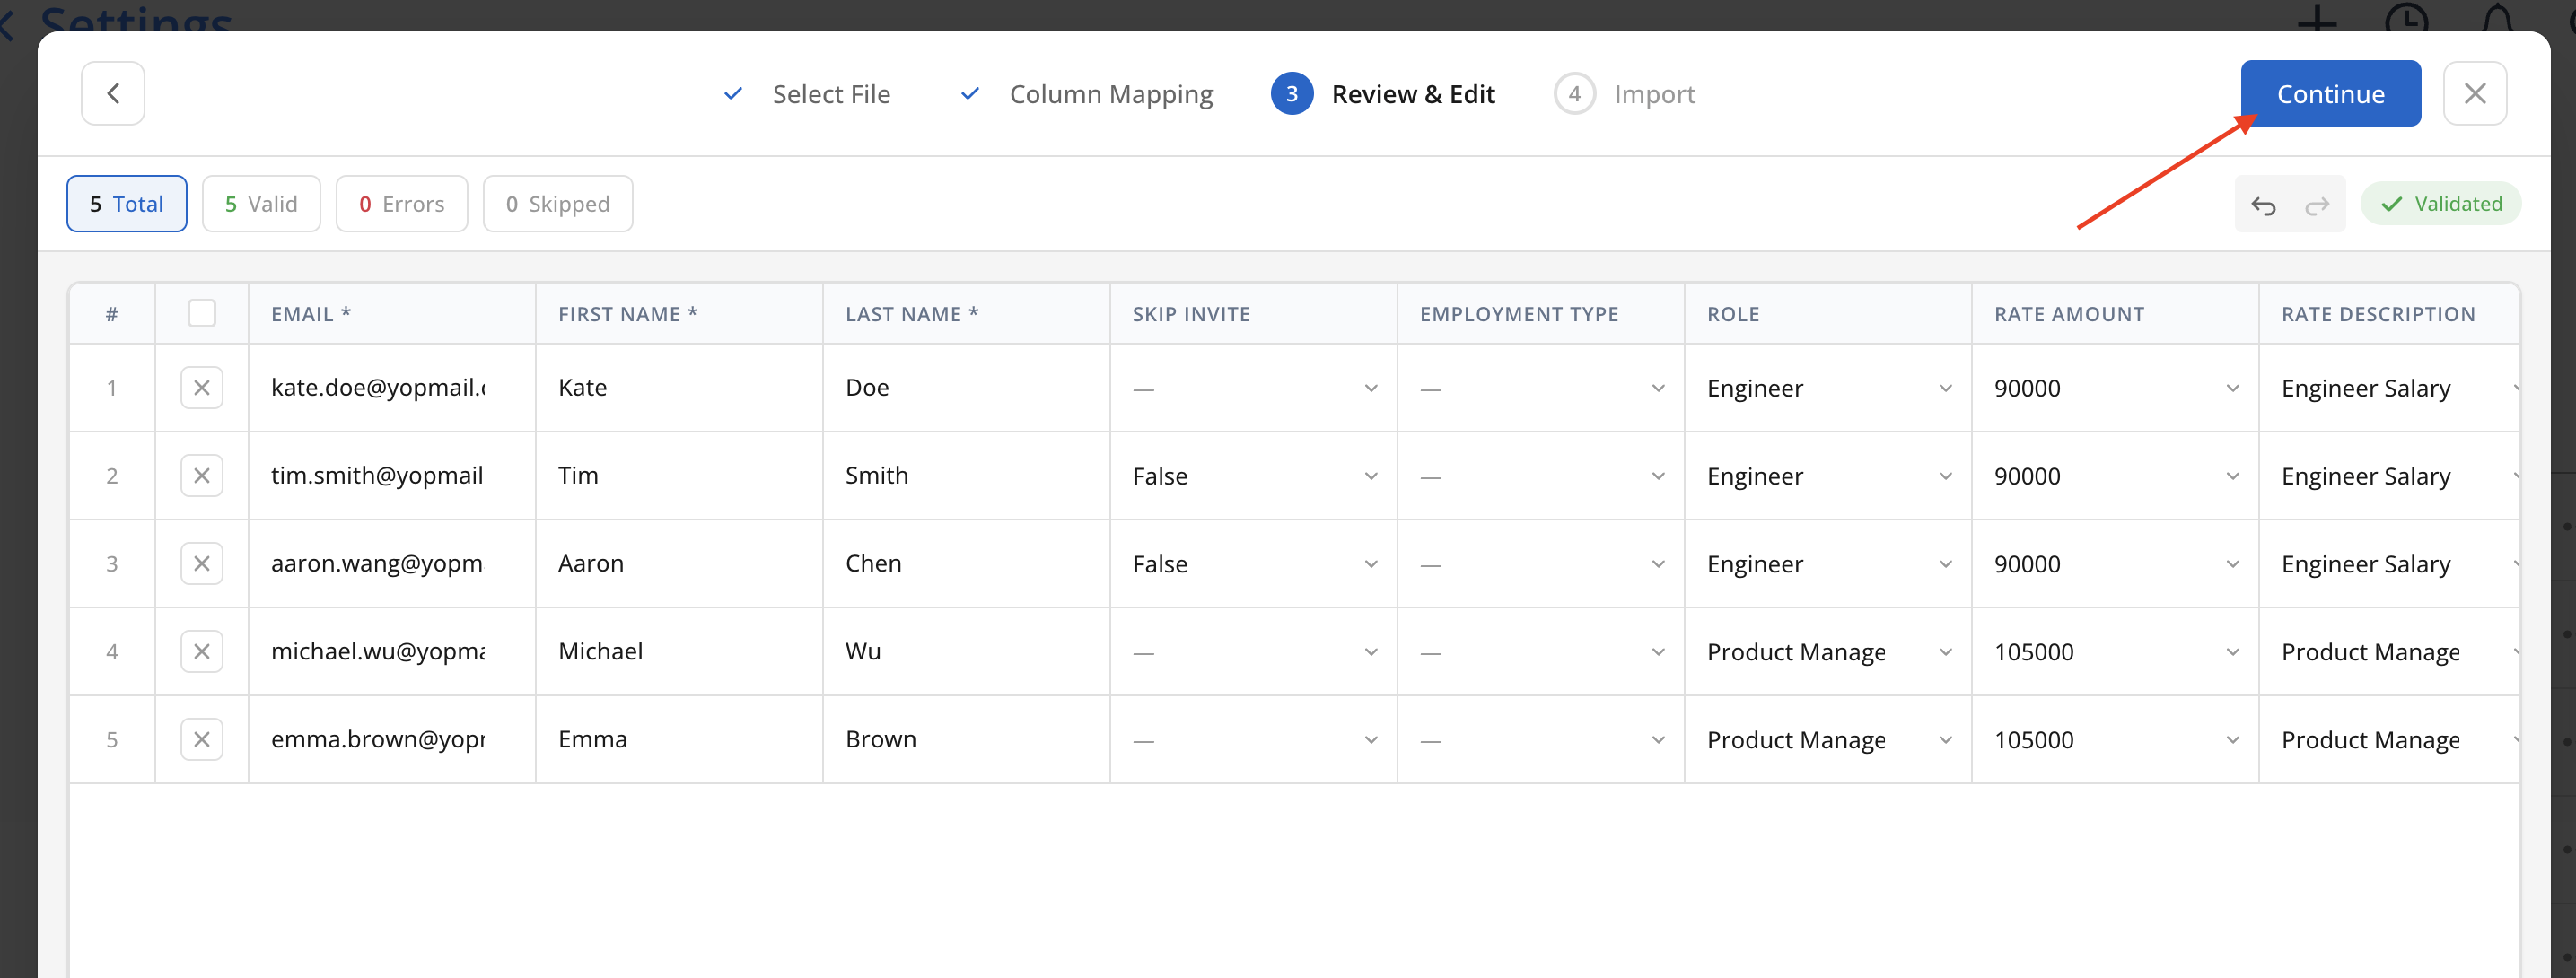
Once all errors are fixed, click
Continueon the top to the Review & Edit step. If all data looks good, clickContinueto the Import step.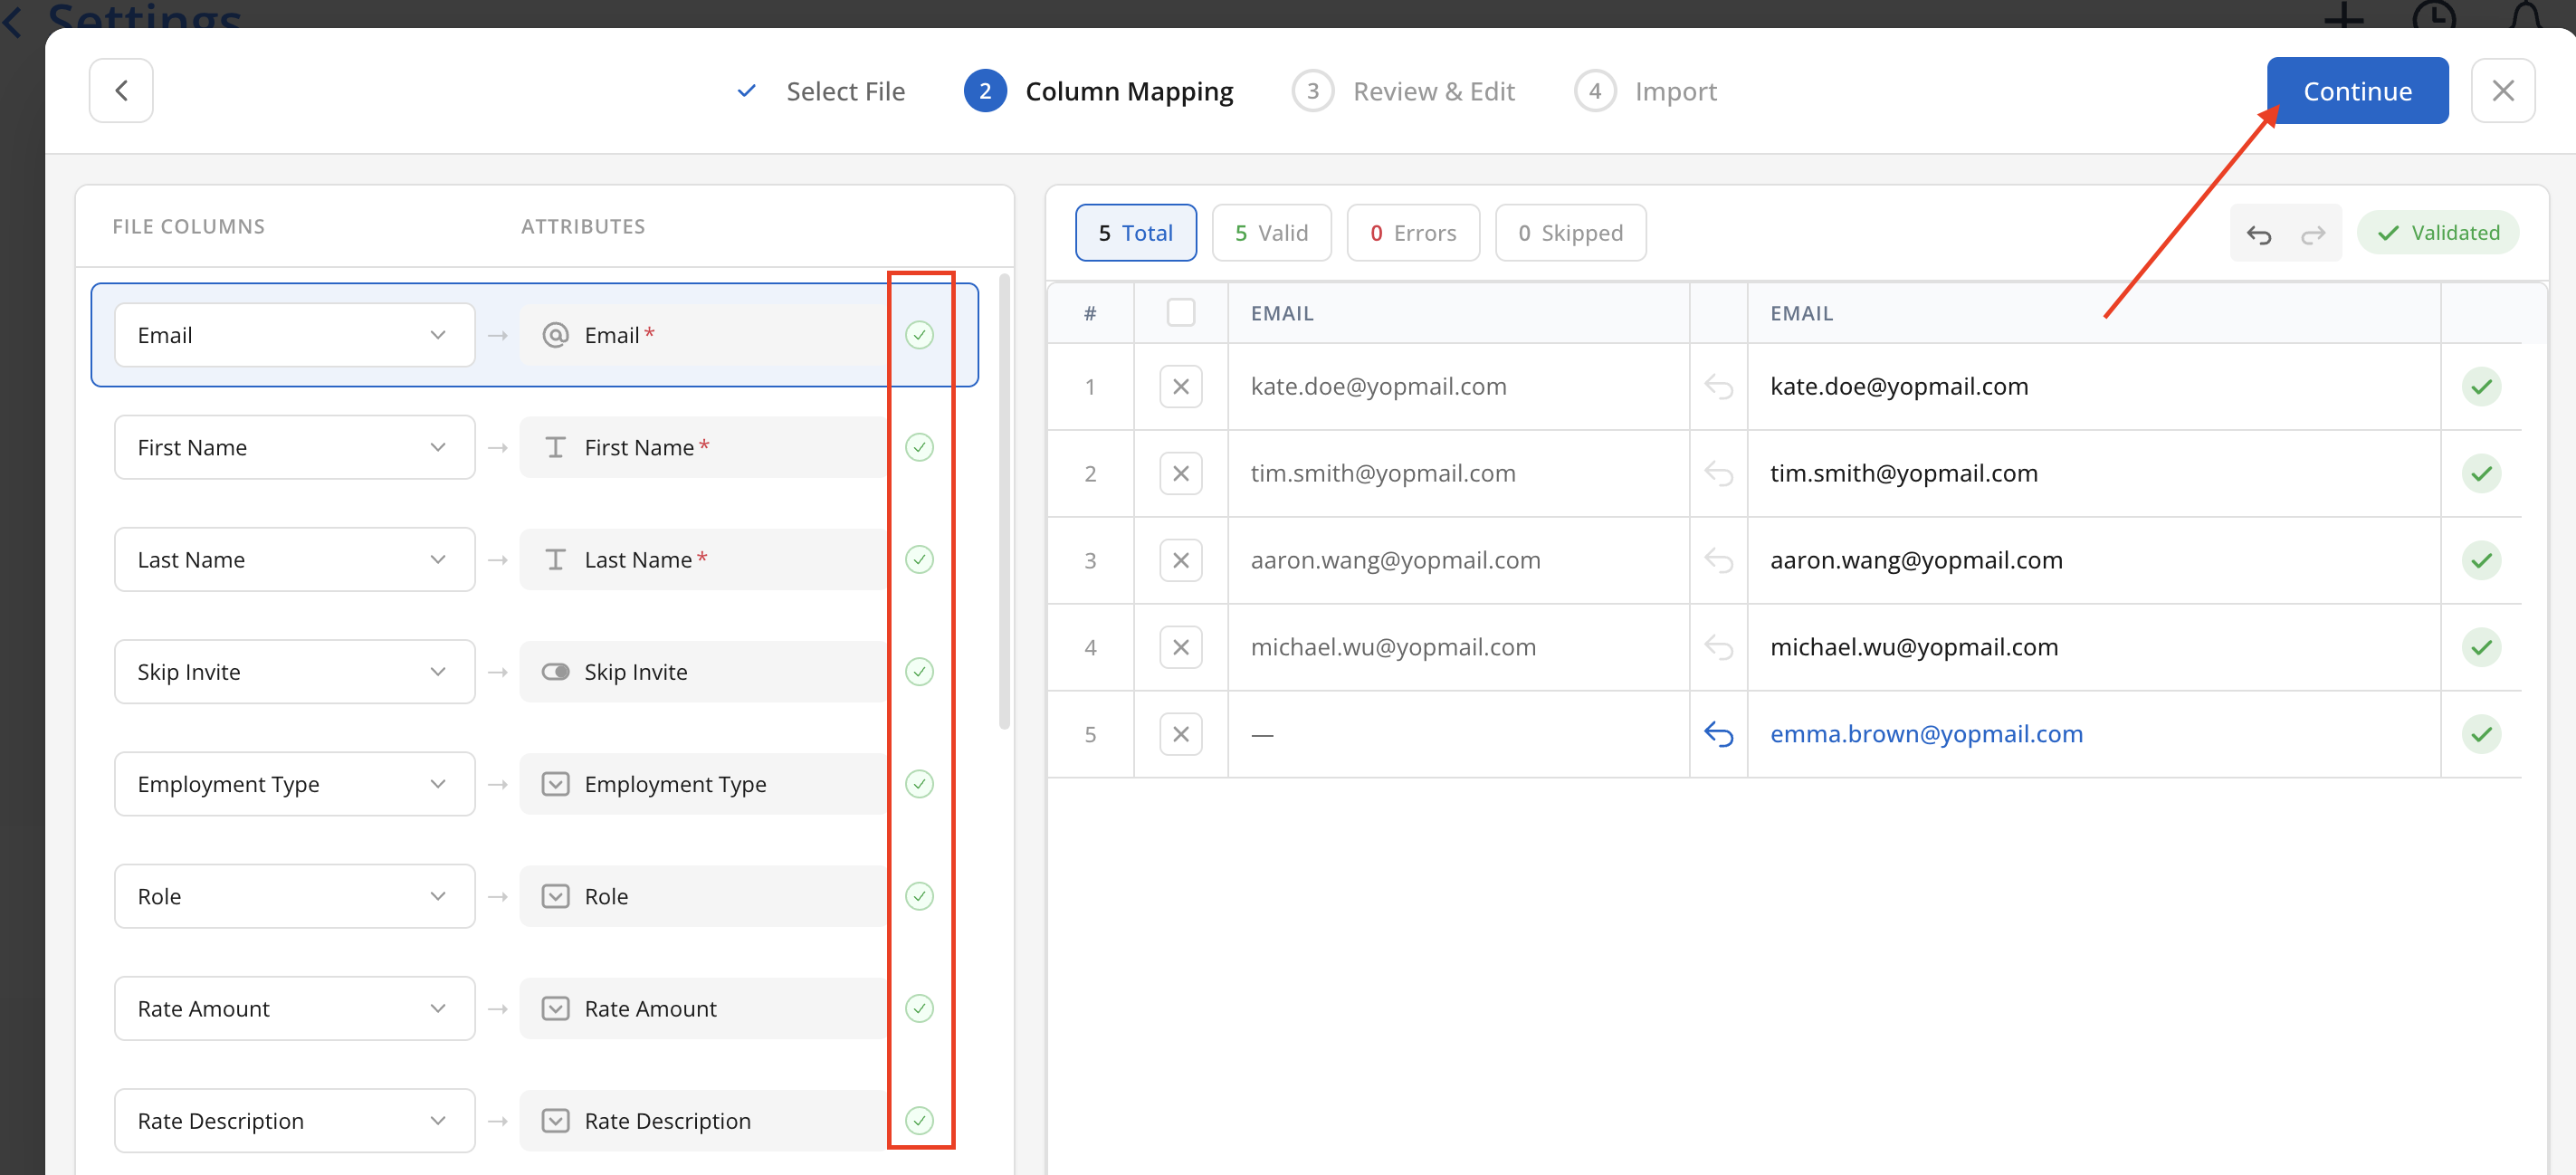
- Click
Confirm Importin the Import step to submit data.

Note: You should see this message when it's successfully uploaded

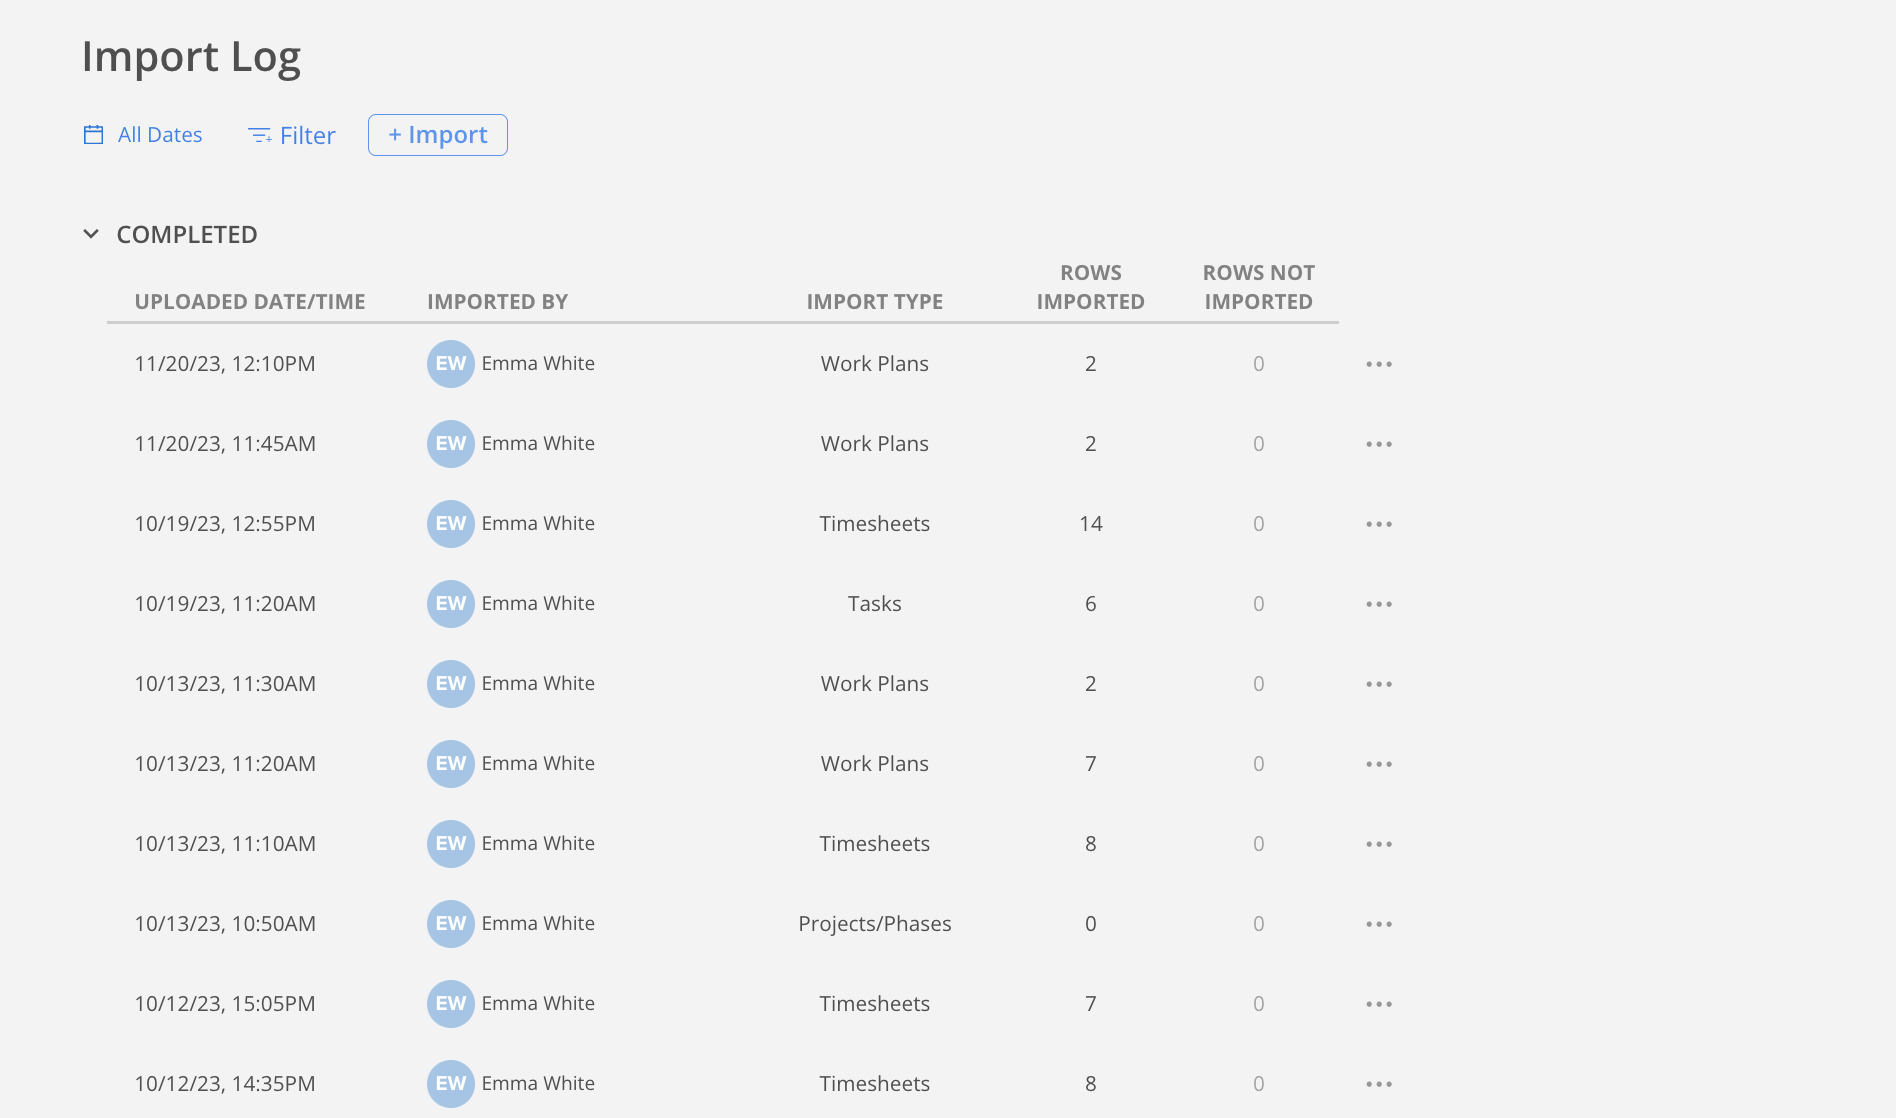
- Navigate to Company Settings -> Import to find your uploaded import in the Draft Import section. Click the
Importbutton.
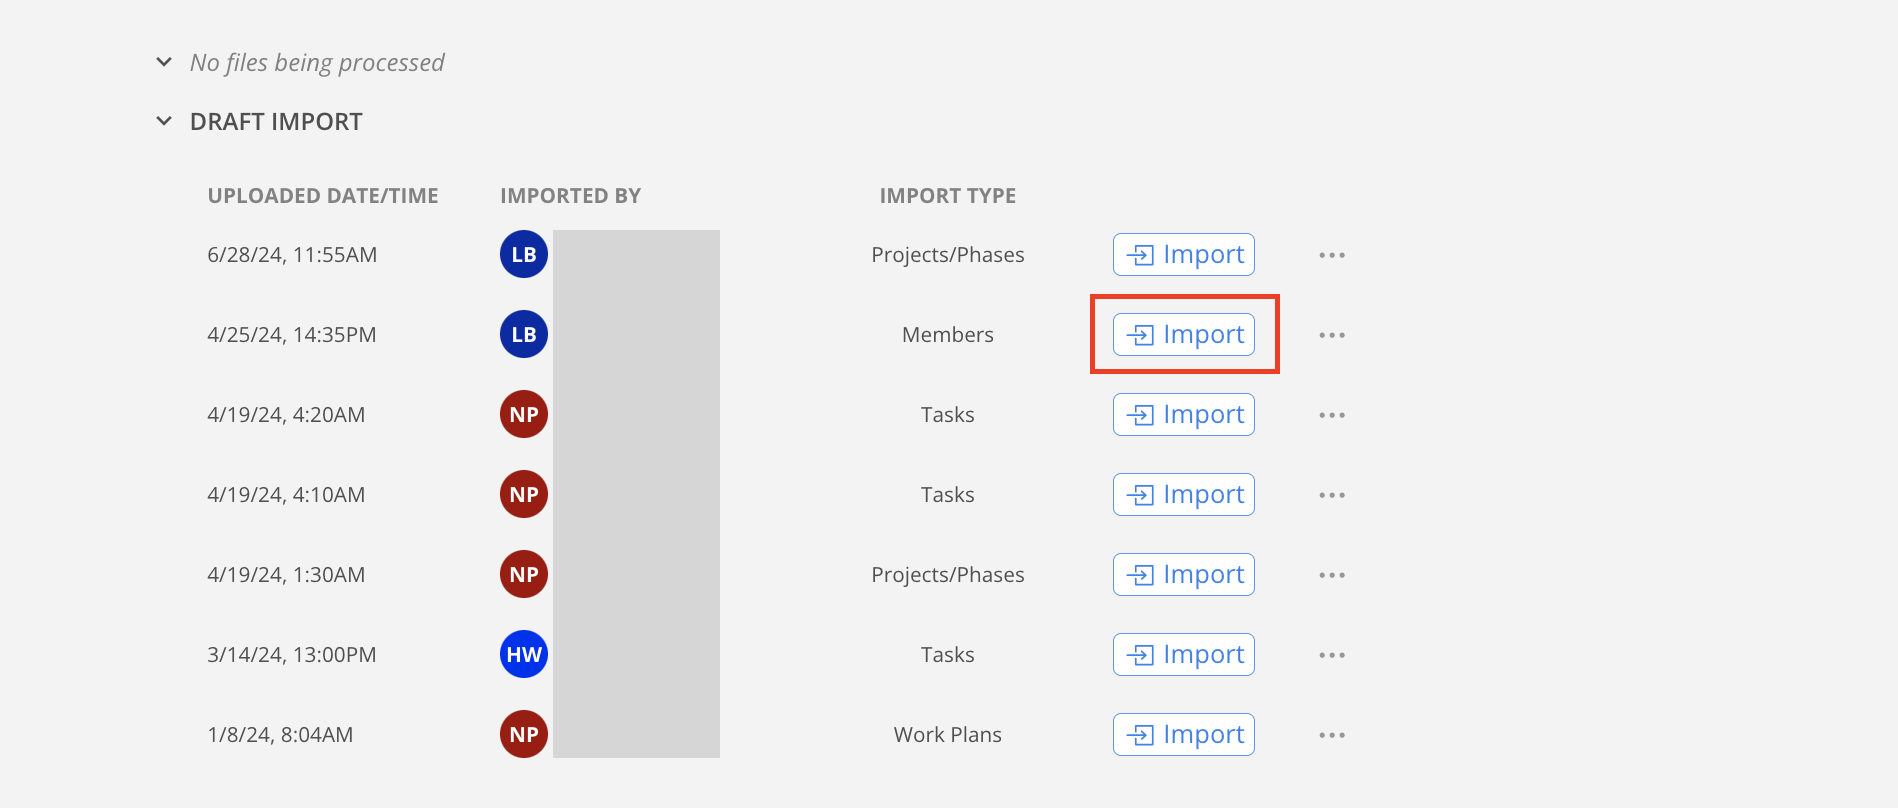
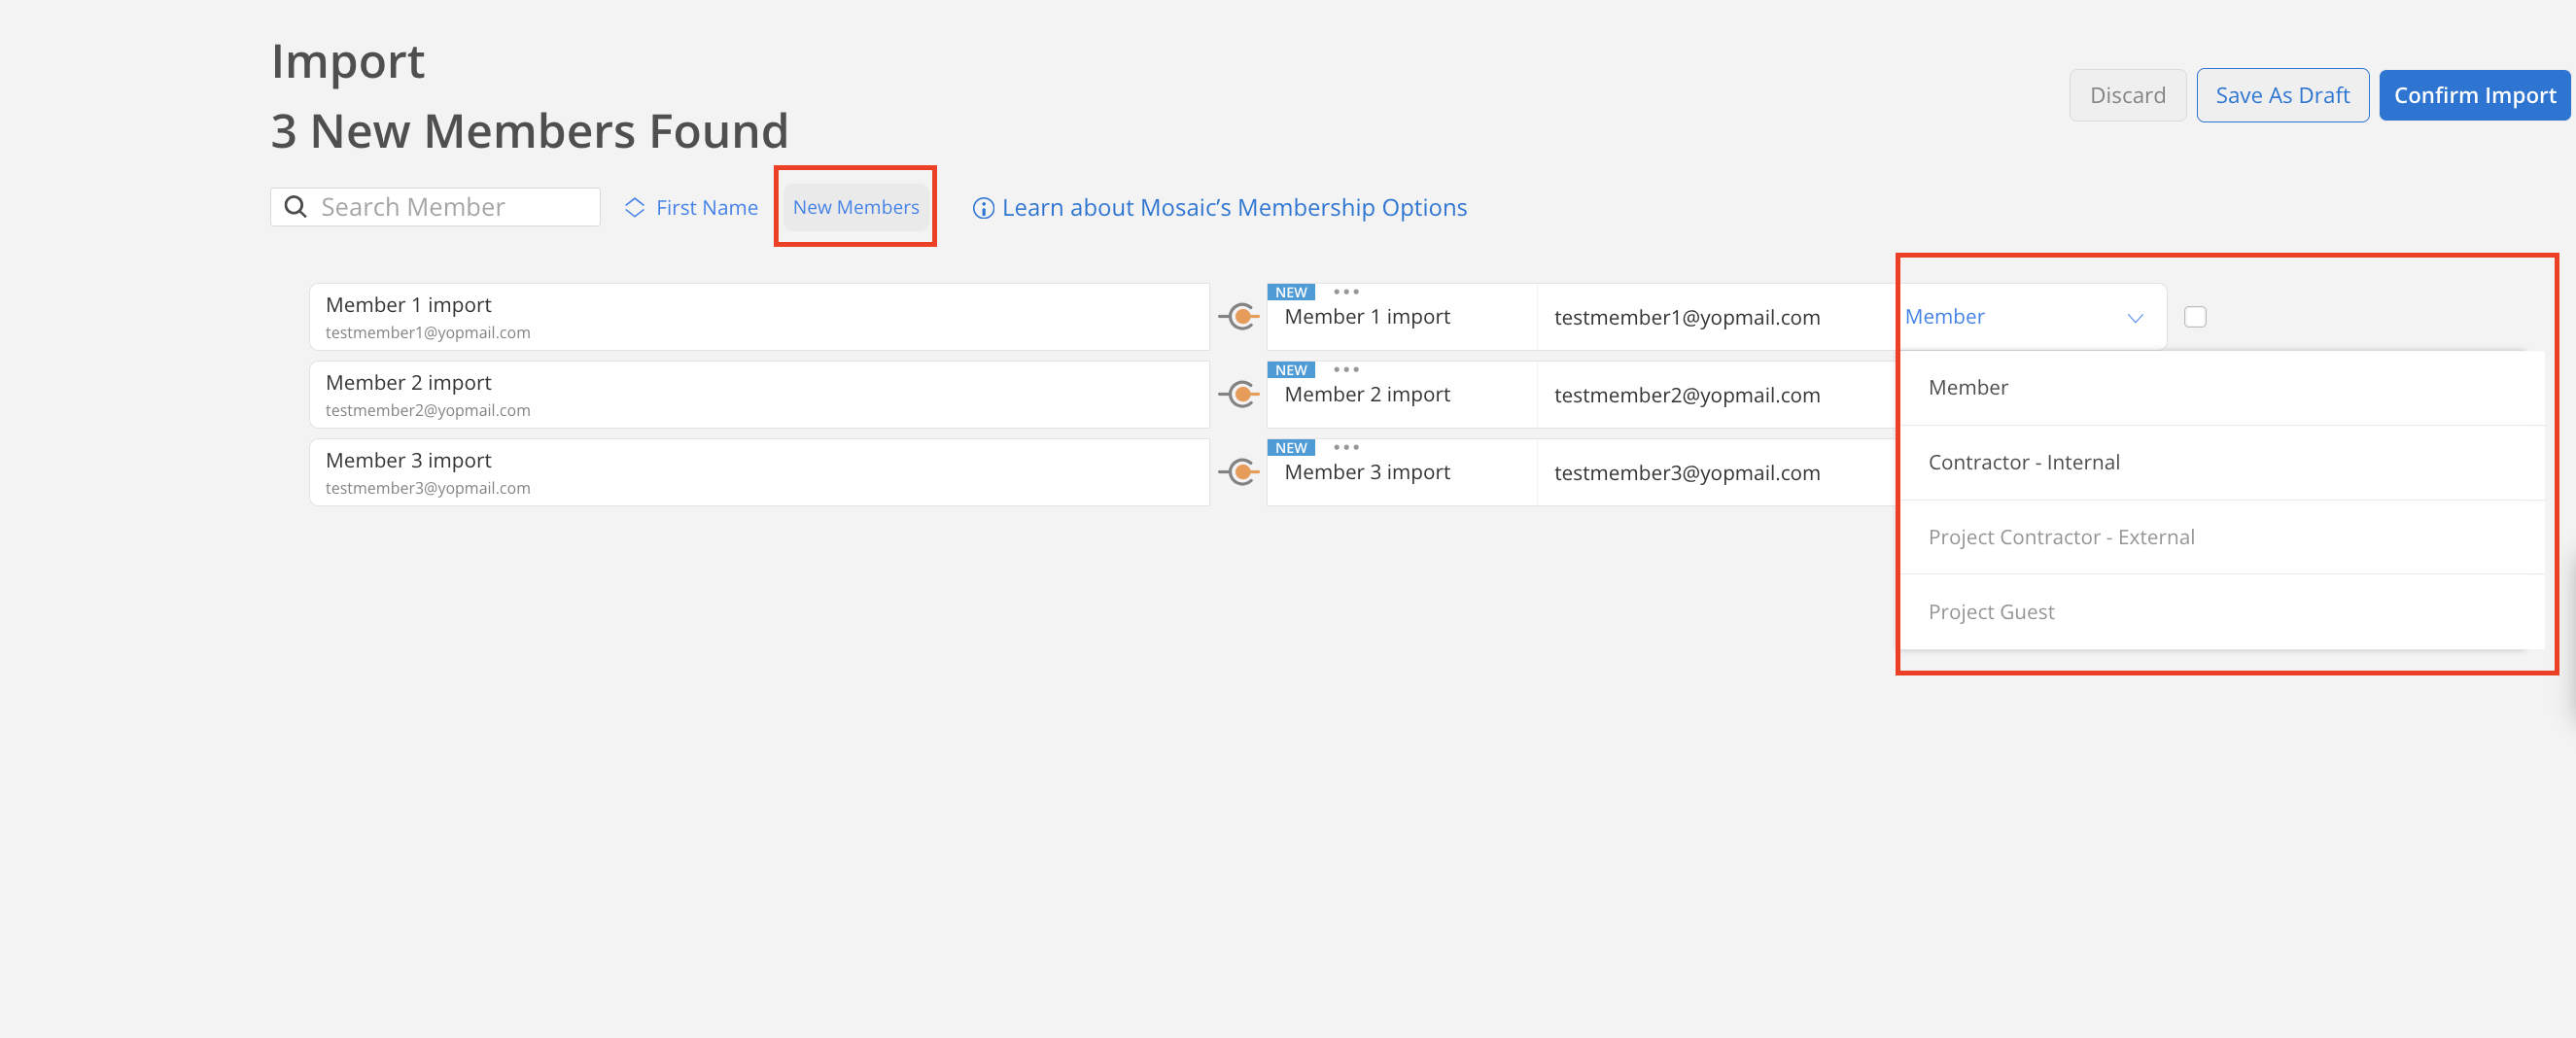
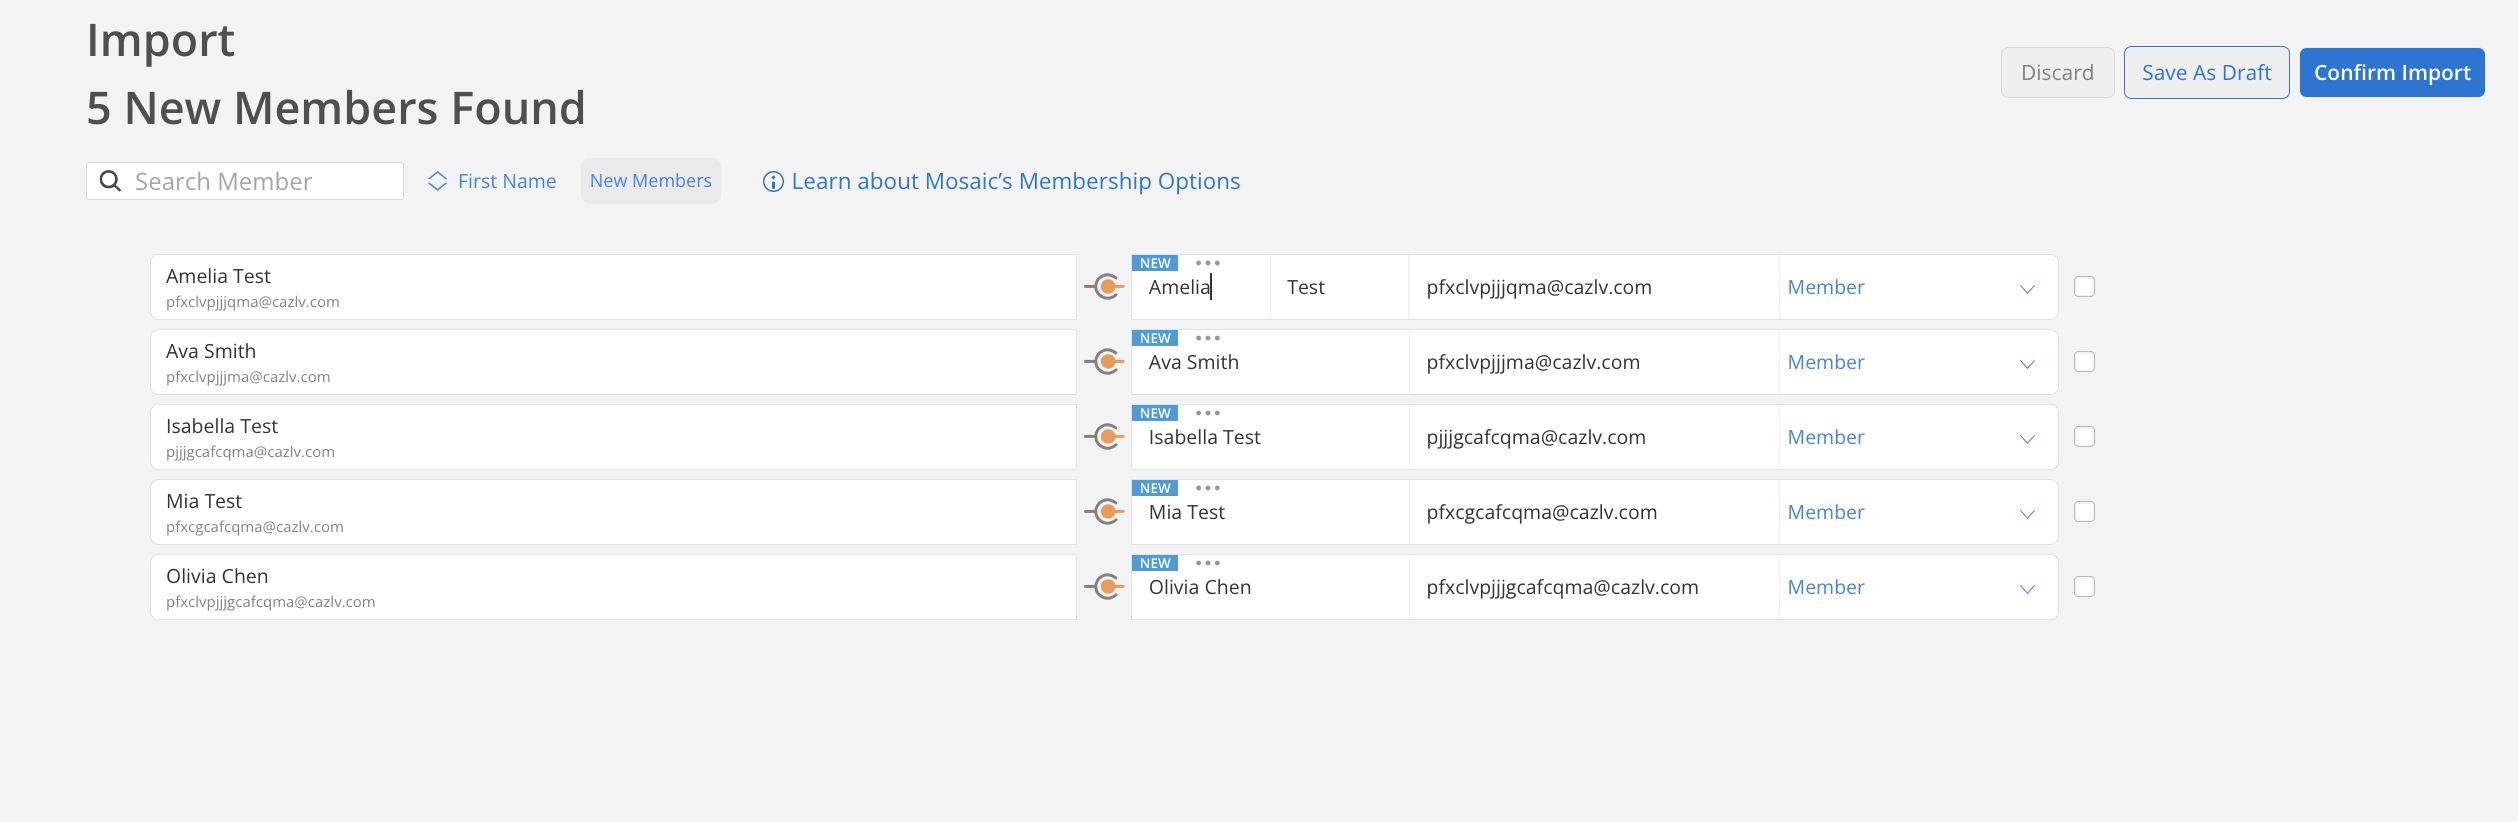
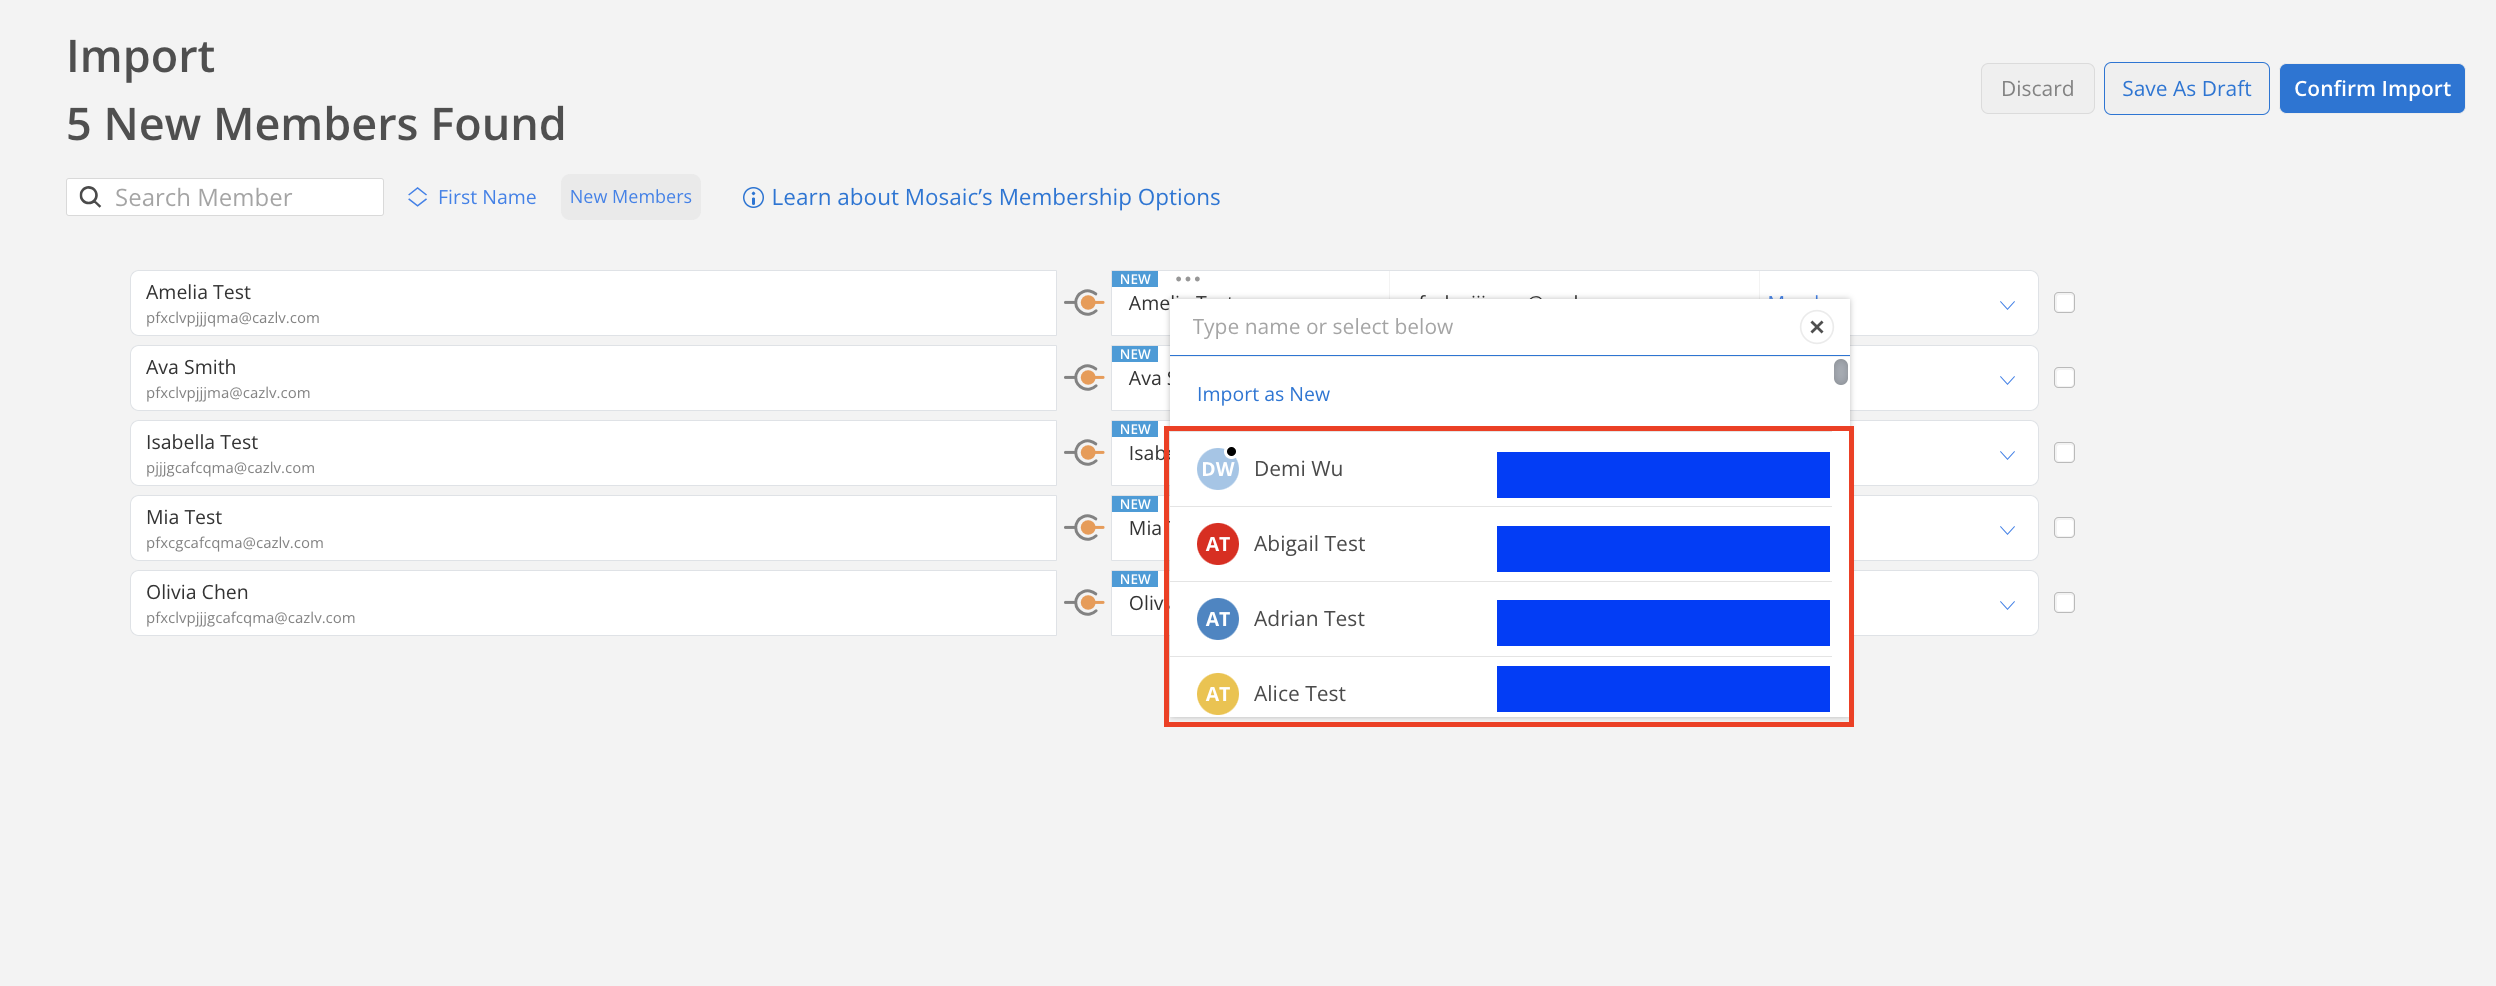
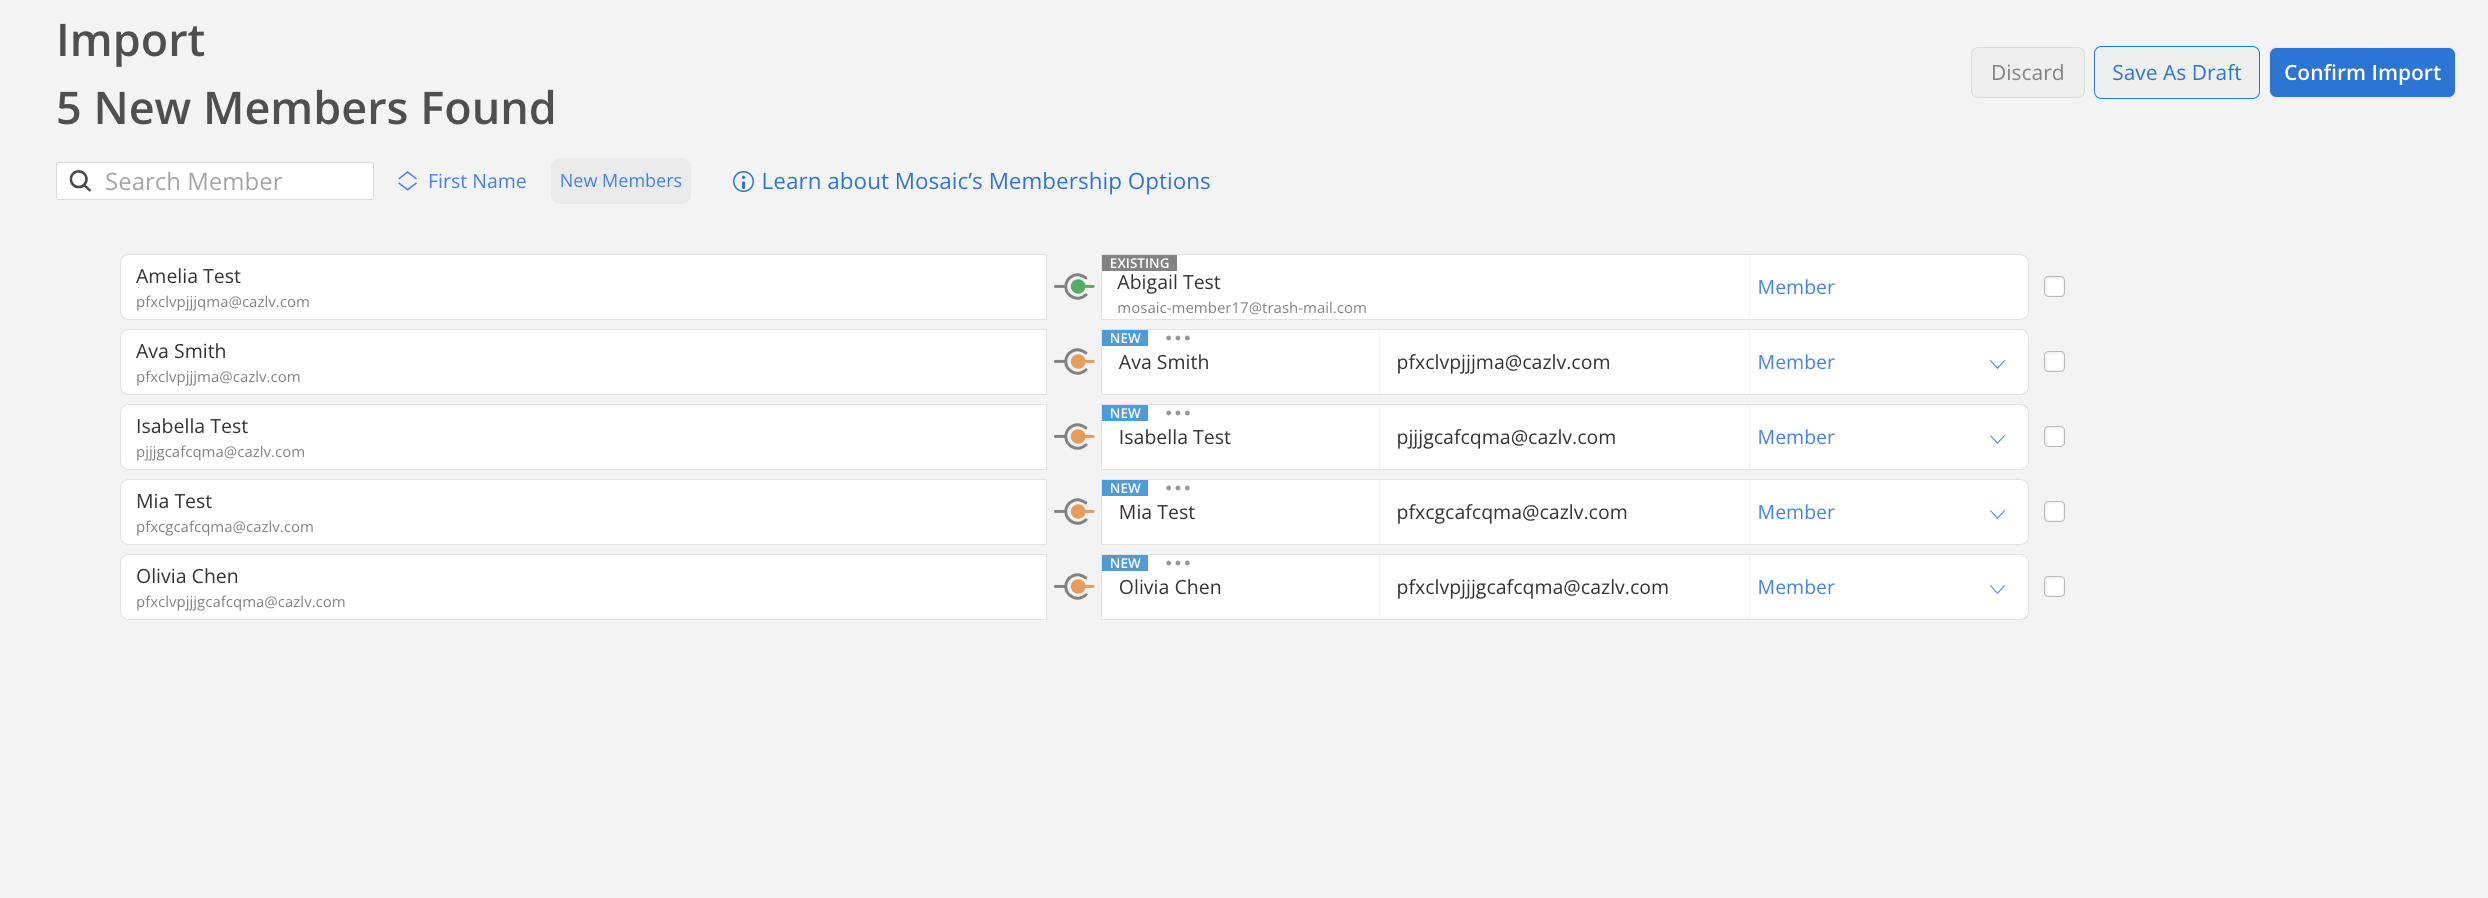
- All members you just imported will show here if they are new. You can click New Members on the top to change to view All members in the import. Click the Member name to edit the name. Click the dropdown on the right side to modify the Membership setting of the imported members.
To link the imported members with existing members, click the three-dot menu at the top of the member name, then click Select Alternate.
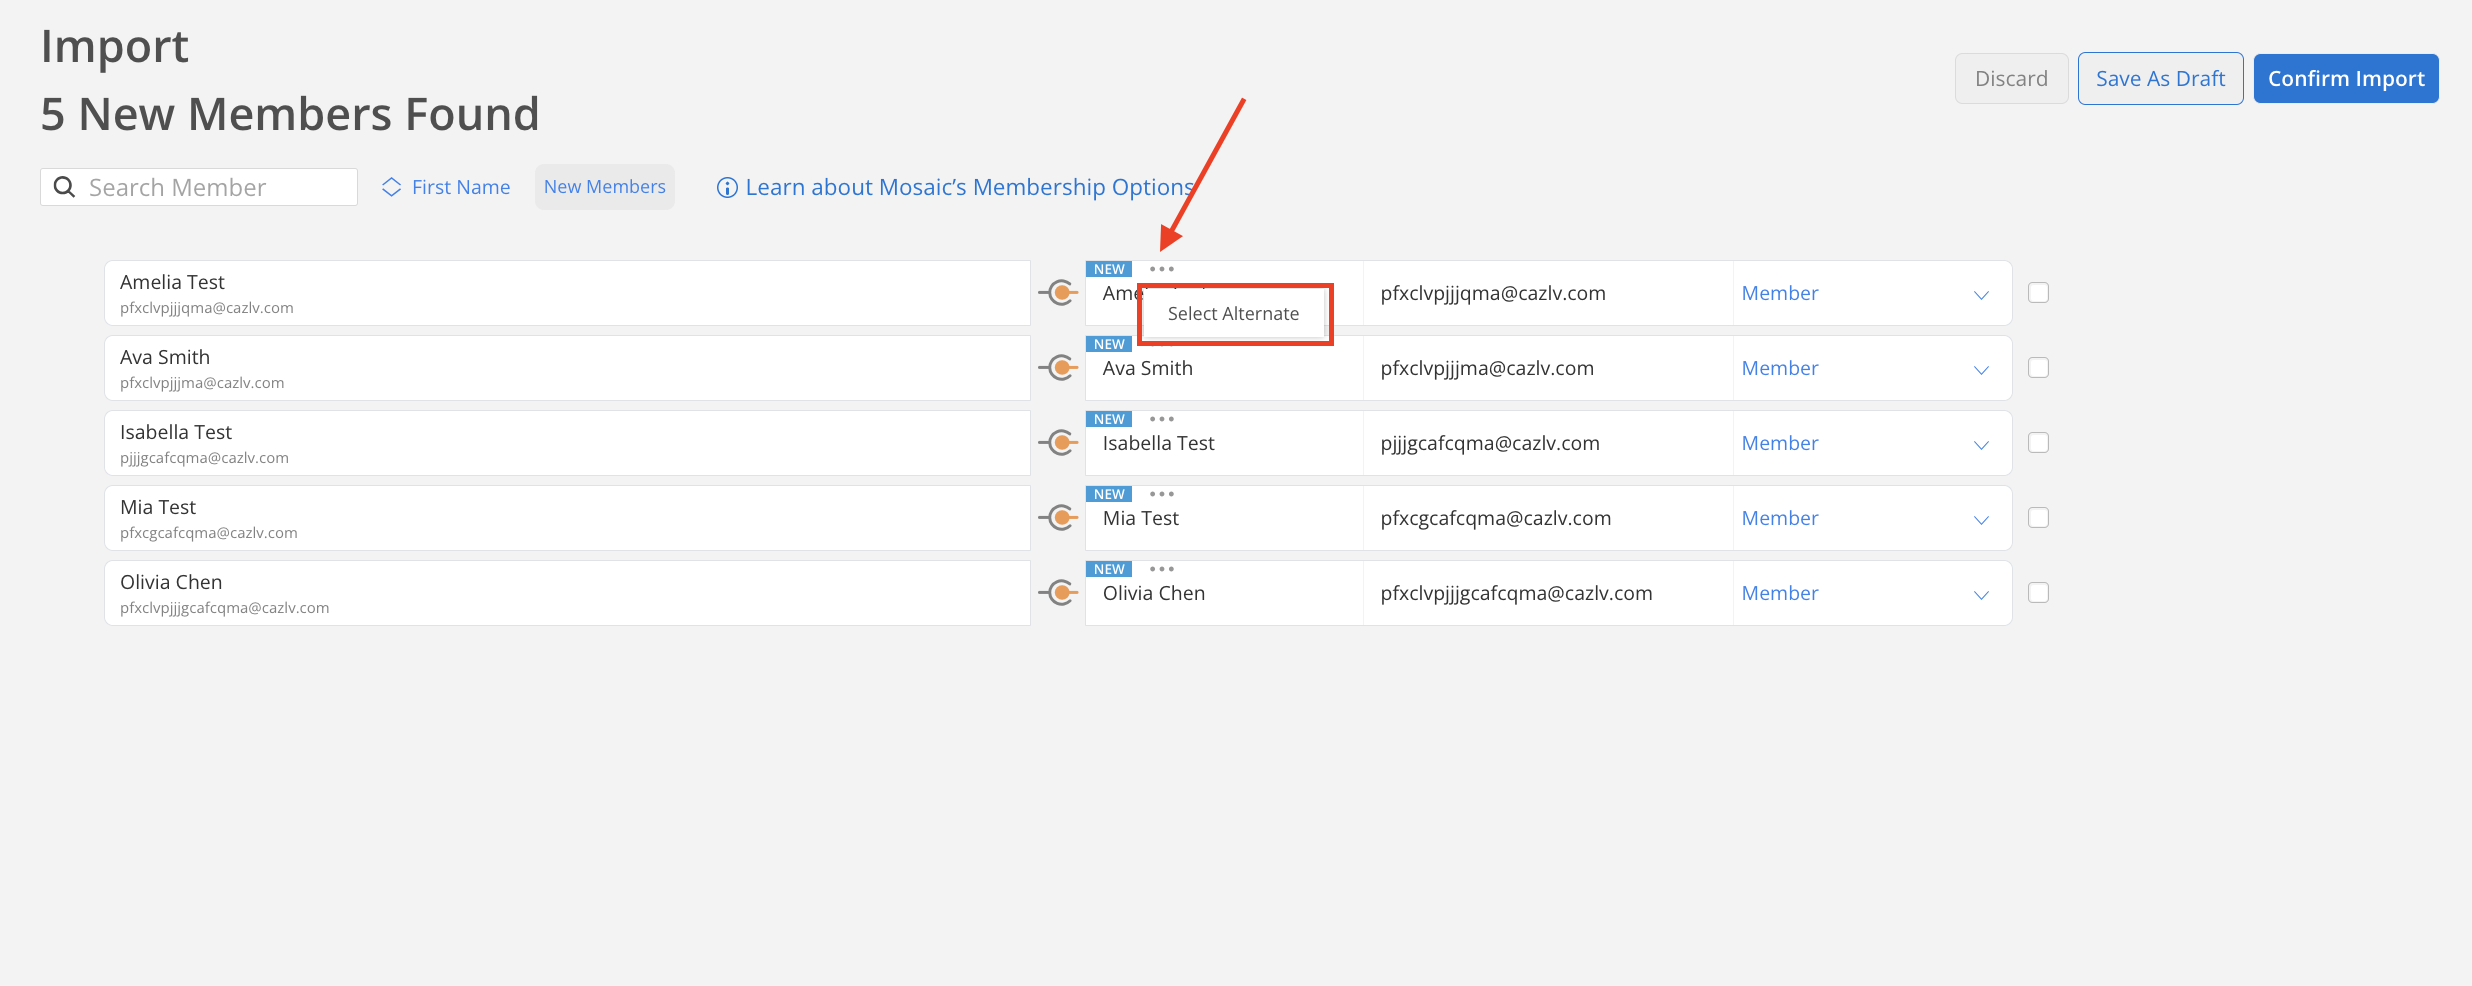
Select an existing member to link with this member.
Note on existing members imported via other integrationsIf members were previously imported using a different integration, some members may appear as "new" in the draft import. As long as the member’s name and email match an existing record, Mosaic will not create a duplicate member.
- Click Confirm Import if everything looks good.
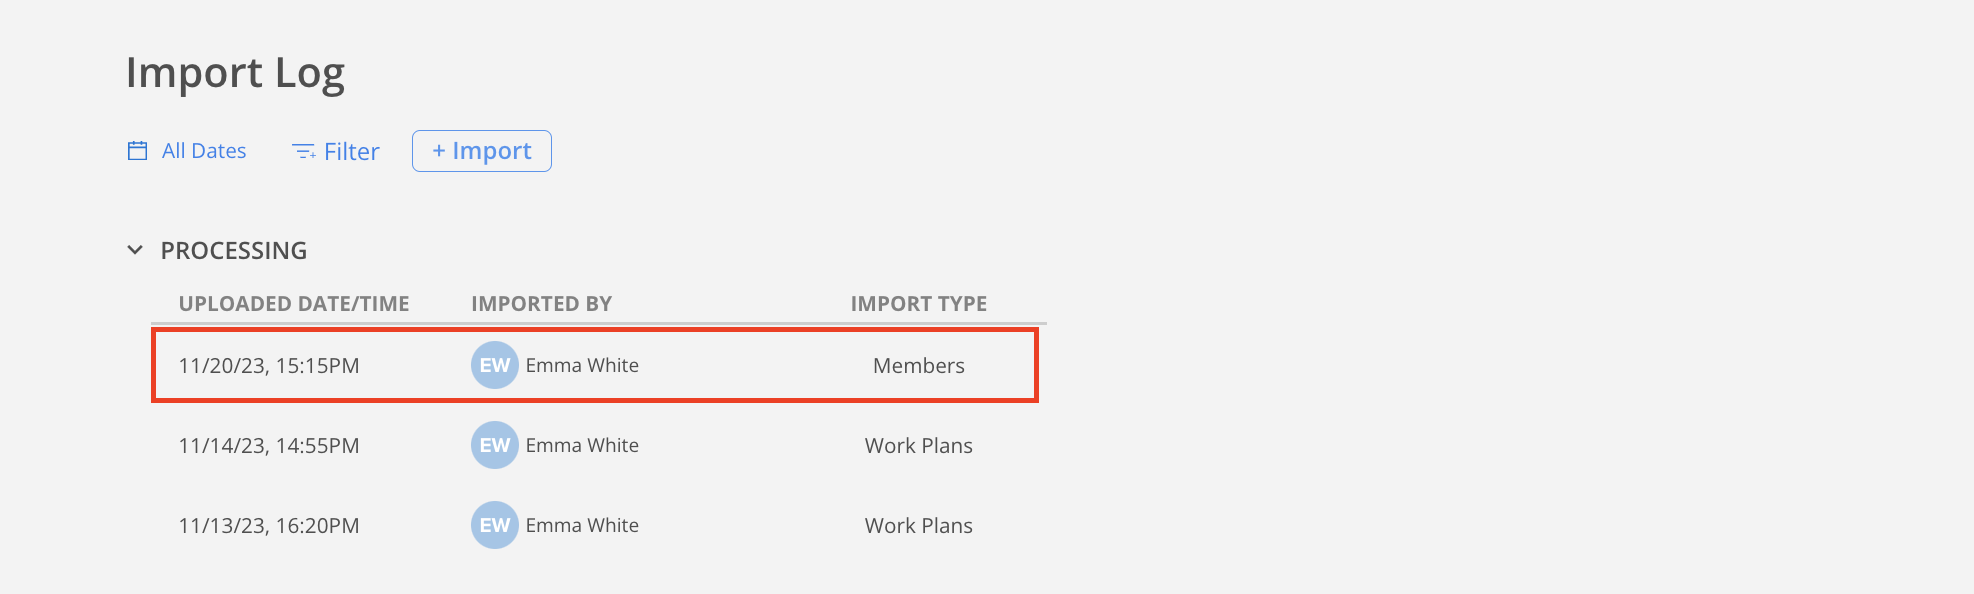
- The import will show in the Processing section. Wait for the import to complete.
- That's it! Once the file processing is completed, it will show in the Completed section. Please allow up to 24 hours for all members to finish populating on Mosaic.