QuickBooks Desktop Best Practices and Troubleshooting
QuickBooks Desktop being Discontinued
- Intuit is discontinuing their support for Quickbooks Desktop and will not be releasing new versions.
- If you would like to use Quickbooks and Mosaic, we recommend switching to Quickbooks Online, which we do offer active support for!
QuickBooks Desktop Integration Best Practices
Best Practices
- If possible, please keep your QuickBooks open to the correct Company File. This will ensure a smoother QuickBooks Web Connector integration process.
- Please ensure:
- QuickBooks Desktop is installed on a computer or virtual machine that is always on.
- The QuickBooks Web Connector is installed on the same machine or virtual machine as the Company File, which is also always on.
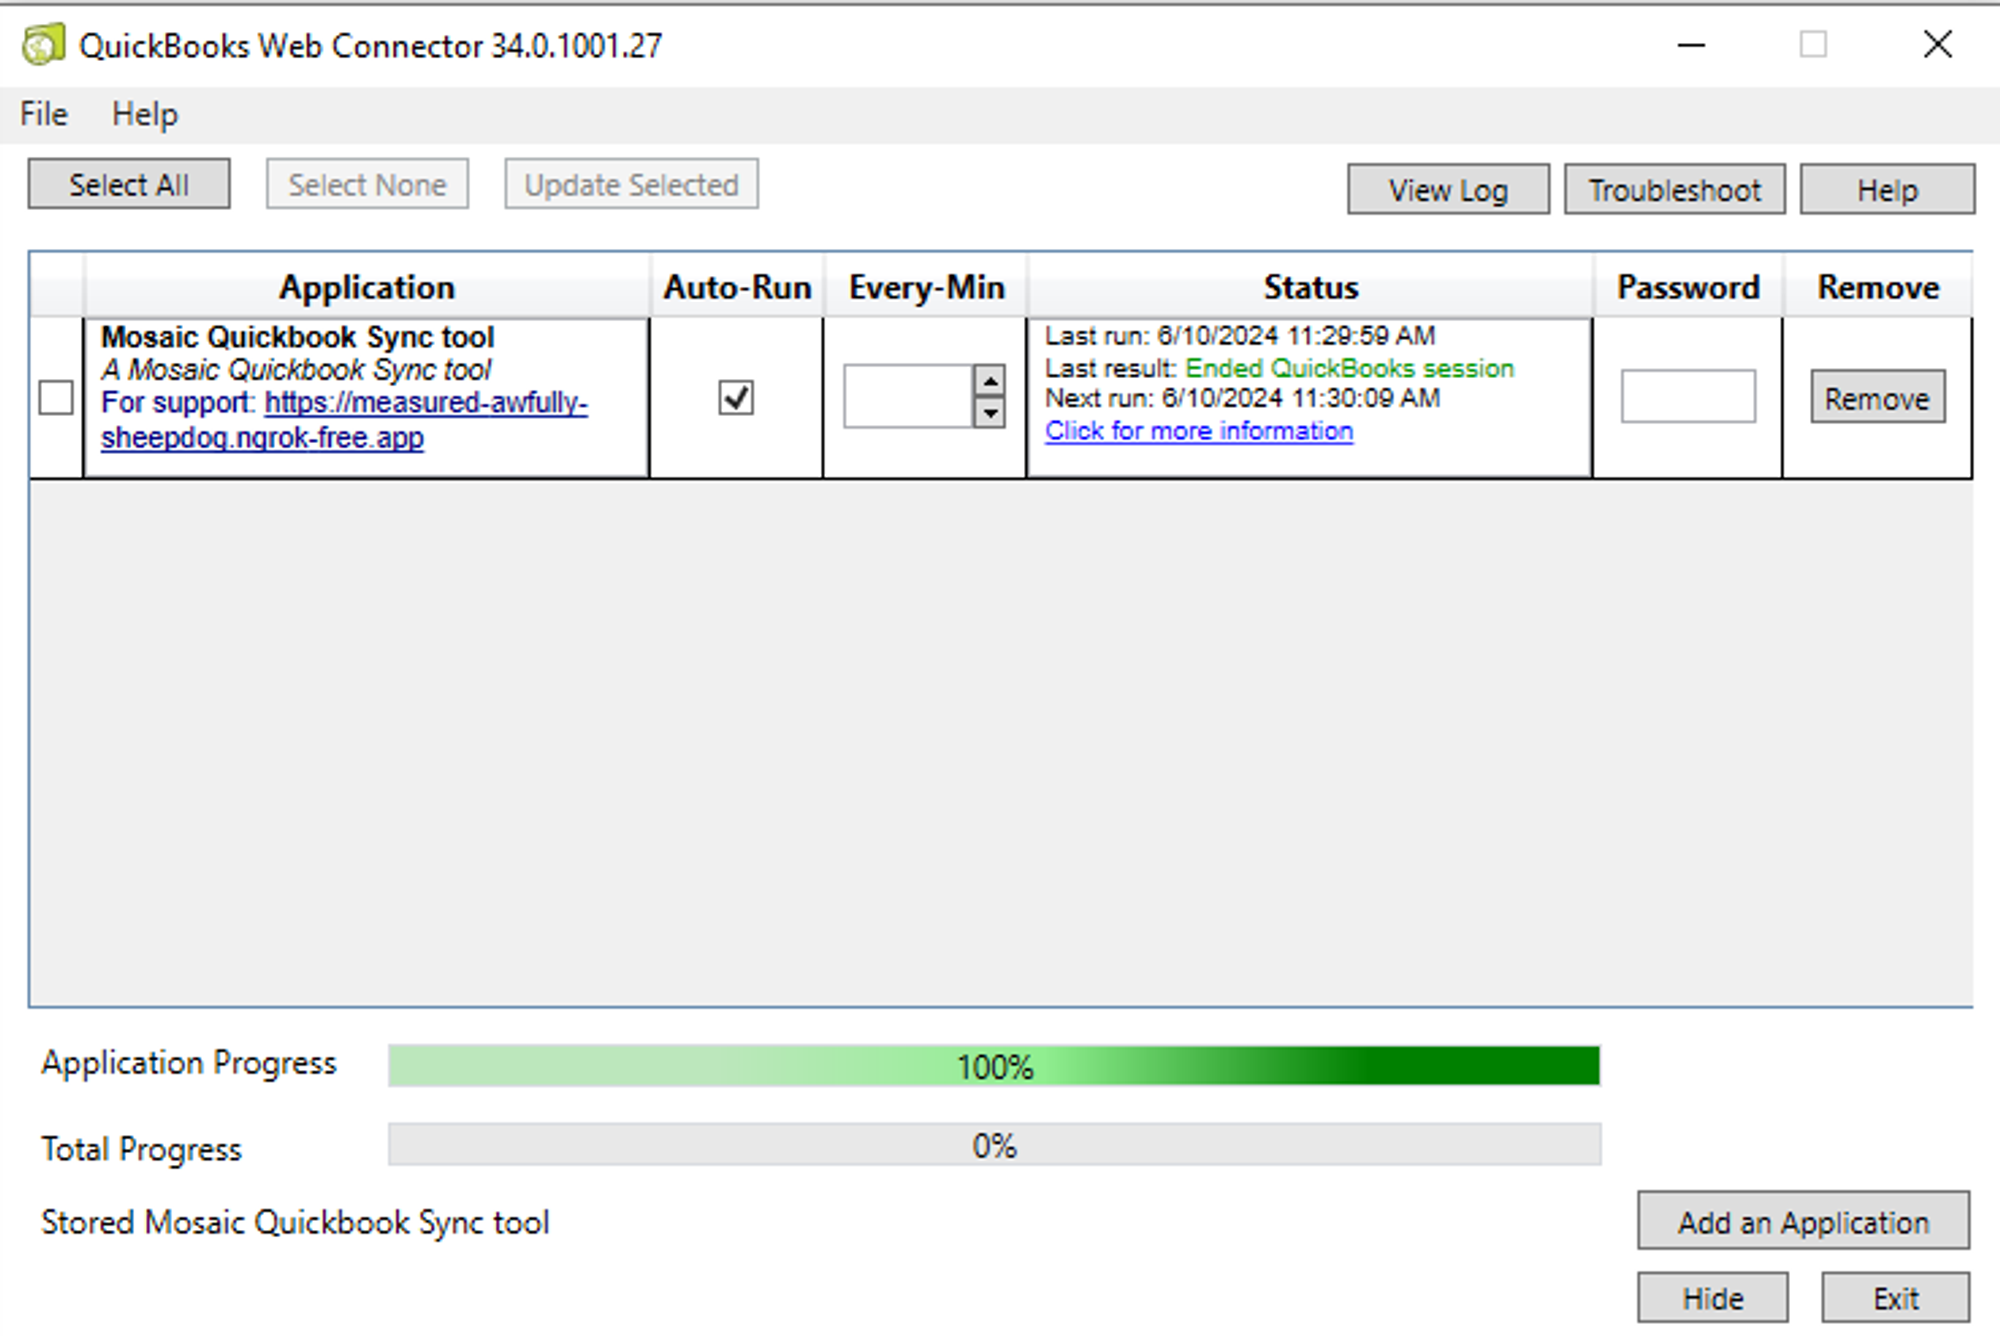
- Ensure the QuickBooks Web Connector application is open at all times and Auto-Run is selected.
- We recommend keeping your QuickBooks Desktop always on, particularly if you can't guarantee that your QuickBooks and PC/VM are fast enough to start within 1 minute.
- Verify that the Last Result shows green text.
- Ensure the Last Run is within a reasonable time range.
To Trigger a Re-sync:
- Select the application and click on Update Selected and check the Last Result.
- If there is an error in the Last Result (red text), click on View Log to generate a log file and provide it to Mosaic.
QuickBooks Desktop FAQs
Q: I have an unused user account under my current QuickBooks license, can I set up the Mosaic user to use this unused user account?
- Yes. Mosaic recommends using a dedicated user account for your integration to avoid any conflicts between the Mosaic <> QB Web Connector and your day-to-day operations.
Q: I want to trial Mosaic, but not purchase the additional QuickBooks license, what are my options?
- You may manually add your data into Mosaic for your trial, or import your data through a CSV import. Talk to your Mosaic Customer Success Manager for more details.
Q: How do I set up the Mosaic admin user?
- Complete the following to create a QuickBooks admin user:
1. Choose Company > Set up Users and Passwords > Set Up Users.
2. In the User List window, select Admin and click Edit User.
3. Enter the name of the Admin user (typically “Mosaic”)
4. (Optional) Enter a password in the Administrator's Password field. Enter the password again in the Confirm Password field.
5. Click the Challenge Question drop-down arrow, select a question, and then enter an answer in the Challenge Answer field.
6. Click Next > Finish.
Source. - The Mosaic admin user should appear in your User List as Mosaic (admin). You can also confirm that this user is an admin by logging into QuickBooks as the Mosaic user and attempting to access the Set up Users menu.
Q: Can I switch back to multi-user mode after the integration is set up?
- Yes. You only need to be in single-user mode during the integration set up or maintenance.
Q: What happens if my server crashes or the computer reboots with the Web Connector?
- No data will be sent if the computer is shut off or if the Web Connector is closed.
- To restore syncing, ensure the Mosaic Web Connector is running on your always-on computer or server.
- To maintain continuous data integration, configure the Web Connector to restart automatically when the computer reboots.
Q: Can I log the Mosaic user out of QuickBooks Desktop?
- Yes. The QuickBooks Web Connector should be able to access your QuickBooks company file without the QuickBooks application actively running, or the Mosaic user being logged in.
QuickBooks Desktop Error Messages
Error: Low success rate detected: Only 0.0% (0 out of 100) of requests to QuickBooks Desktop have succeeded in the past 24 hours.
This error typically indicates that the Company File could not be reached. This may happen because QuickBooks is not running, the user is not logged in, or your computer is off or logged out.
Please ensure the following:
- The machine with the QuickBooks Web Connector and Company File is turned on.
- The QuickBooks Web Connector is running on the machine.
- Refer to the troubleshooting page here to check the status of the QuickBooks Web Connector or contact the Mosaic Support team for assistance.
Error: QuickBooks is not responding, please try again.
- Make sure that your Always-On computer is not frozen or running too many tasks
- Make sure that you only have one instance of QuickBooks Desktop running
- Ensure QuickBooks 22/23 is updated to at least version R3
- Hard reboot of server/machine where QuickBooks 22/23 is installed to insure all QuickBooks processes and services have been reset.
- Uninstall any other versions of QuickBooks from the machine that are not in use.
- Reinstall QuickBooks 22/23 and the qbfc13 driver to ensure its components have been correctly installed: https://developer.intuit.com/app/developer/qbdesktop/docs/get-started/older-versions-of-the-desktop-sdk
- Reset the QuickBooks permissions certificate if one already exists. Please talk to your Customer Success Manager for assistance completing this step.
Error: A QuickBooks company data file is already open and it is different from the one requested or there are multiple company files open.
- Close QuickBooks or open QuickBooks to the correct company file.
If that does not resolve try:
- Ask all users to close QuickBooks (including yourself).
- Once this is done, only you should sign back into the company file.
- Attempt to publish an invoice. The error message will only clear after an invoice is successfully published to QuickBooks.
Error: Recent changes to your configuration require you (the QuickBooks Administrator) to go into the Integrated Applications preferences and re-authorize your integrated application to log in automatically.
- Make sure all QuickBooks users are connected in Multi-User Mode. If that does not resolve the error, try to refresh the Integrated Applications:
- Open QuickBooks: Launch the QuickBooks application where the company file is located.
- Navigate to Integrated Applications Preferences:
- If you're using QuickBooks Desktop, navigate through the menu bar by clicking on "Edit" > "Preferences".
- In the Preferences window, select "Integrated Applications" from the list on the left-hand side.
Click on the "Company Preferences" tab.
- Locate the Mosaic<> QB Web Connector application: In this tab, you'll see a list of all applications that are integrated with your QuickBooks. Locate the Mosaic <> QB Web Connector application.
- Reauthorize the application:
- Select the application and then click "Properties".
- In the Properties window, ensure that the "Allow this application to login automatically" checkbox is checked. If it isn't, check it. If it's already checked, uncheck it and then check it again.
- Make sure the correct user is selected in the 'Login as' dropdown menu (usually this would be the 'Mosaic' user that the Mosaic <> QB Web Connector application should be associated with).
- Click "OK" to save your changes, and then "OK" again to close out of Preferences.
- Restart QuickBooks: Close QuickBooks entirely, and then re-open it.
Error: A modal dialog box is showing in the QuickBooks user interface. Your application cannot access QuickBooks until the user dismisses the dialog box.
- To resolve this issue, identify the dialog box that is causing the error. This could be an error message, a warning or a prompt that requires user action.
- Make sure all QuickBooks Desktop dialog boxes are closed.
- If you don't see any open dialog boxes or closing the dialog box does not resolve the issue, try restarting your QuickBooks application. This will refresh the software and may resolve the error.
- If restarting the application still does not resolve the error, other possible causes an outdated version of QuickBooks. Check for any available updates and download them if necessary.
Error: This application is unable to log into this QuickBooks company data file automatically. The QuickBooks administrator must grant permission for an automatic login through the Integrated Application preferences. If such permission was already granted, the administrator must revoke permission, save preferences, then grant the permission again.
- To resolve this issue, Open QuickBooks: Start by opening the QuickBooks application where the company file is located.
- Go to the Integrated Applications Preferences:
- If you're using QuickBooks Desktop, navigate through the menu bar by clicking on "Edit" > "Preferences".
- In the Preferences window, choose "Integrated Applications" from the list on the left-hand side.
- Click on the "Company Preferences" tab.
- Manage Applications: Here, you'll see a list of all the applications that are integrated with your QuickBooks. Find the Mosaic <> QB Web Connector.
- Revoke Permissions: Select the application, and then click "Properties". In the new window, uncheck the "Allow this application to login automatically" box. Click "OK", then "OK" again to close out of Preferences.
- Restart QuickBooks: Close QuickBooks completely, and then re-open it.
- Re-Grant Permissions: Go back into "Edit" > "Preferences" > "Integrated Applications" > "Company Preferences", select the application again, and click "Properties". This time, check the "Allow this application to login automatically" box. Make sure the correct user is selected in the 'Login as' dropdown menu (typically this would be the 'Mosaic' user that the Mosaic <> QB Web Connector application should be associated with). Click "OK", then "OK" again to close out of Preferences.
After following these steps, the application should be able to connect to your QuickBooks company file without any issues. If you're still experiencing problems, it may be necessary to contact QuickBooks Support for further assistance.
Error: QuickBooks file was not found.
- Ensure the Company File is situated in its designated folder. If you're uncertain about its intended location, please contact your Customer Success Manager for guidance.
Error: QuickBooks Cannot Be Started
This is currently a common issue with QuickBooks 22/23. We've had success solving these issues with the following steps:
- Ensure QuickBooks 22/23 is updated to at least version R3
- Hard reboot of server/machine where QuickBooks 22/23 is installed to insure all QuickBooks processes and services have been reset.
- Reinstall QuickBooks 22/23 and the qbfc13 driver to ensure its components have been correctly installed: https://developer.intuit.com/app/developer/qbdesktop/docs/get-started/older-versions-of-the-desktop-sdk
- Uninstall any other versions of QuickBooks from the machine that are not in use.
- Reset the QuickBooks permissions certificate if one already exists. Please talk to your Customer Success Manager for assistance completing this step.
QuickBooks is simply known to be finicky and suddenly drop connections. Usually the first, and easiest step is to reset the permissions certificate. Other times, a full restart of the machine where QuickBooks is running can clear up any issues.
Error: QuickBooks Error - 80040408 (Unknown Error): Could Not Start QuickBooks
This error commonly occurs when trying to connect to QuickBooks, often due to improper setup in a multi-user environment or QuickBooks not being left open to "No Company" for a data refresh.
Possible Causes
-
Quick Start Option Enabled:
- The "Keep QuickBooks running for quick startup" option is on.
-
Single User Mode Conflict:
- Another user is using QuickBooks in single-user mode.
-
File Name Mismatch:
- The QuickBooks file name has changed or differs from the originally configured name.
-
File Path Mismatch:
- The QuickBooks file has been moved to a different location than initially set up.
Solutions
-
Disable Quick Start Option:
- Go to General -> My Preferences in QuickBooks and turn off "Keep QuickBooks running for quick startup."
-
Ensure Multi-User Mode:
- Make sure no other user is logged in single-user mode to avoid conflicts.
-
Correct the File Name:
- Revert the file name to the original or use the Add/Remove Company option to reset it. For multi-user versions, do this on the server.
-
Update the File Path:
- Use the configuration tool to update the file path. For multi-user versions, this must be done on the server.
Additional Troubleshooting
If the issue persists, review the QuickBooks SDK log file at C:\ProgramData\Intuit\QuickBooks\qbsdklog.txt for more detailed errors.
If you need further assistance from the Mosaic team, please provide the log file for investigation.
For QuickBooks-specific issues, consider contacting Intuit/QuickBooks support.
Error: Failed to save the Time Tracking transaction. The employee <Employee ID> provided in the TimeTrackingAdd request has the checkbox "Use time data to create paychecks" set to the Unknown state.
<Employee ID> provided in the TimeTrackingAdd request has the checkbox "Use time data to create paychecks" set to the Unknown state.An error occurs when attempting to save a Time Tracking transaction due to the "Use time data to create paychecks" setting for an employee being set to an "Unknown" state. This setting is crucial for determining how an employee's time data is utilized in payroll processing. Steps to resolve:
- Access Company File: Open the QuickBooks Company File where the issue has arisen.
- Navigate to Employee Center: From the main menu, select "Employees" and then choose "Employee Center."
- Edit Employee Details: Locate and select the employee in question. Click the "Edit" (✎) button, then navigate to the "Payroll Info" tab.
- Adjust Time Data Settings: In the "Payroll Info" section, you'll find a checkbox to "Use time data to create paychecks". Here, make the necessary adjustment:
- Selected [Use time data to create paychecks]: Opt for this if the employee's time tracking data should influence paycheck calculations. Suitable for hourly employees.
- Unselected [Do not use time data to create paychecks]: Opt for this if the employee's time data should not affect paychecks, commonly used for salaried positions.
Once you've updated the setting, please let Mosaic know to try recreating the Time Entry on QuickBooks Desktop again. This should fix the issue and ensure your time data is correctly used for payroll.